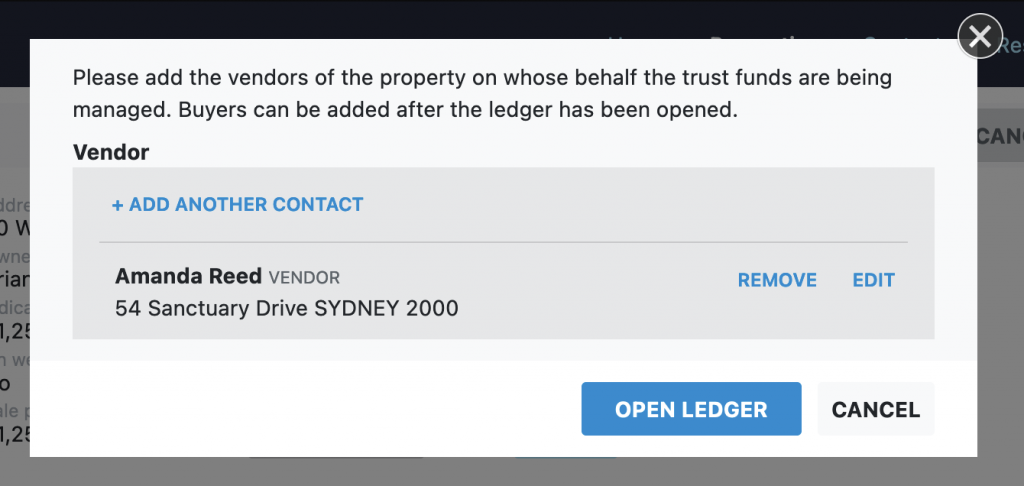
Opening a ledger
To record transactions in your trust account for a sale, you must first open a ledger for the property.
- Open the property/listing and click on the “Sales Trust” tab.
- Click the “Open ledger” button.
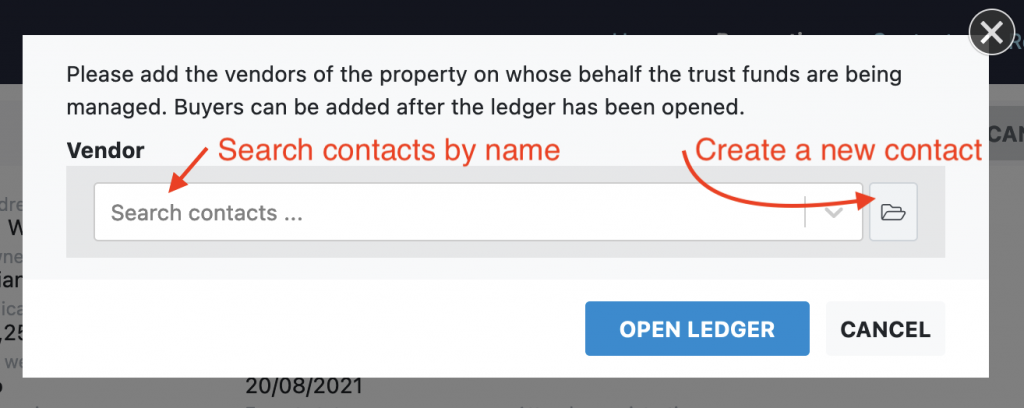
- If you have not previously added a vendor for the listing you will be prompted to create or select one now.
After selecting the vendor contact you will need to complete the address of the contact. This is shown on receipts and vendor statements.
- Optionally you can enter the bank account details for the vendor. This is to help with your record keeping for this ledger.
- If the contact is acting in a legal capacity for the vendor, you can enter their legal title. This is commonly used for trustees of deceased estates. This title is shown on receipts and vendor statements.
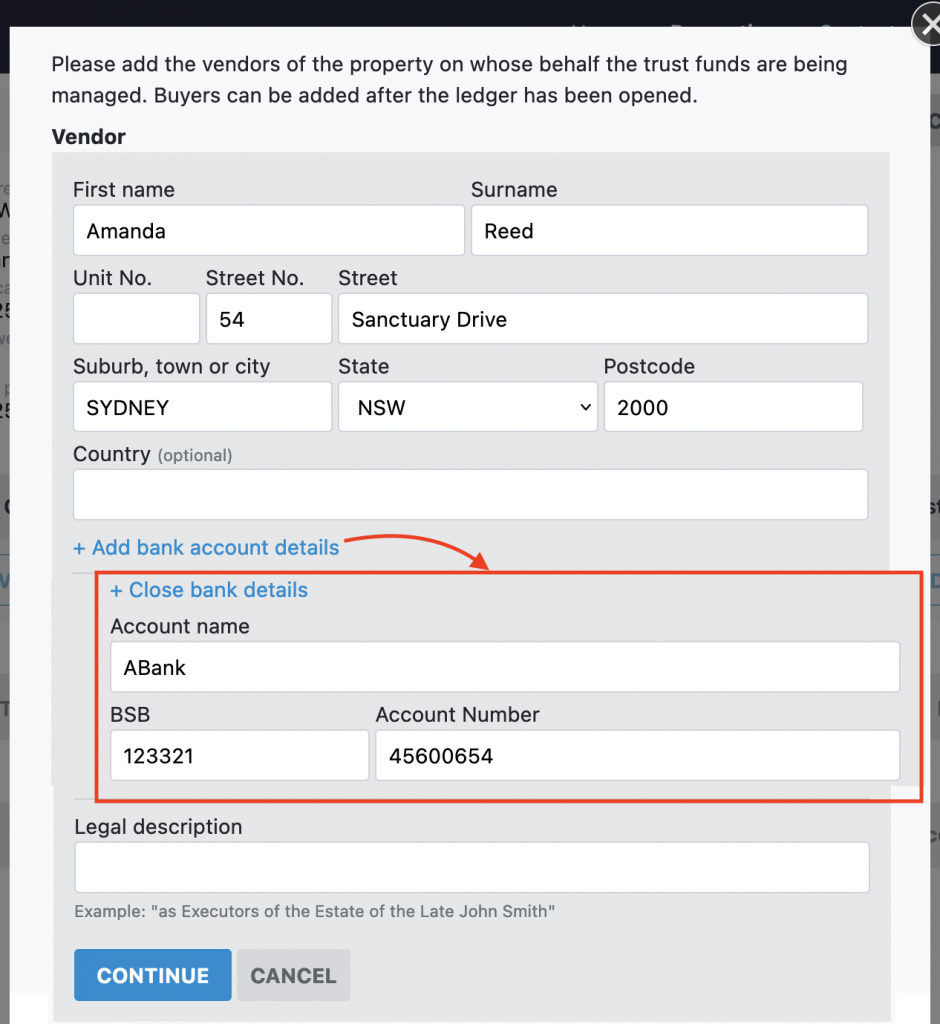
- You can add as many vendors as needed. The click “Open Ledger” to complete the process.
- The newly open ledger, showing the sales trust menus, ledger folio number and name, and the attached vendors

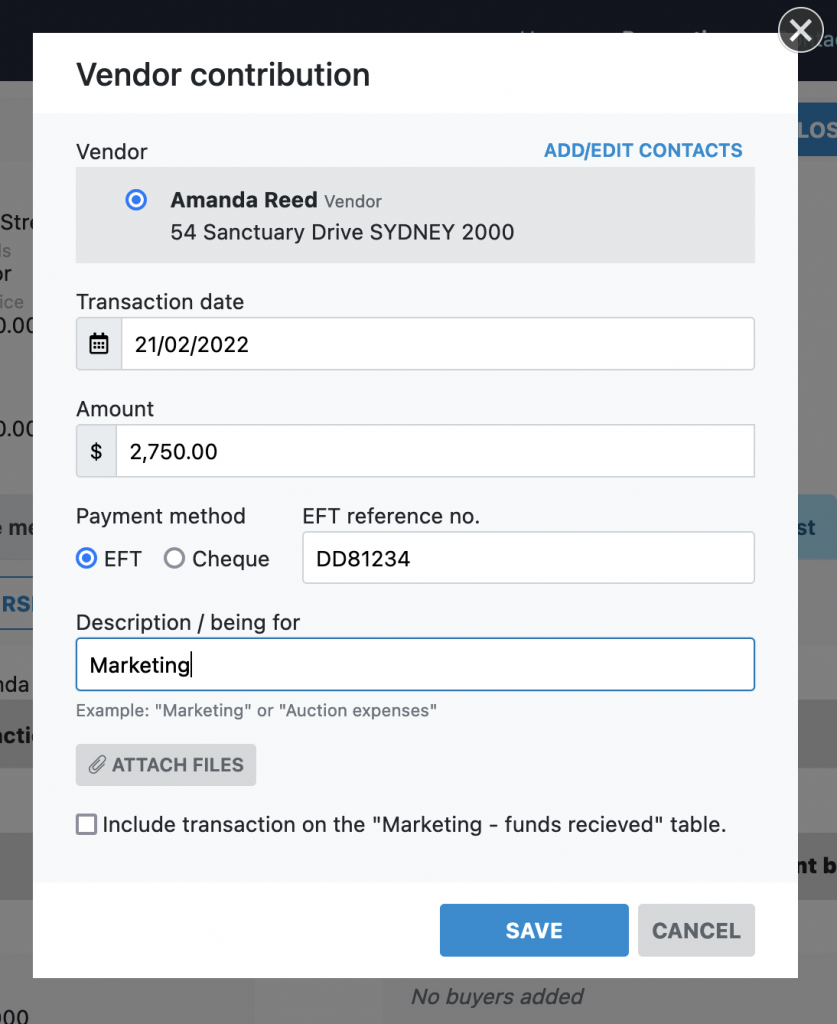
Receiving funds
Click receive funds menu. Select between a “vendor contribution”, typically for advertising funds, or “buyer deposit”. See below for instructions on receiving funds from a third party on behalf of a buyer or vendor.

Enter the transaction details for the deposit:
- Select the vendor/buyer contact that is making the payment.
- Enter the transaction date, this is the date the payment occurred on your bank statement. The system will automatically record a book date for the transaction as well based the current date.
- Record whatever payment details you have for the transaction, such as a cheque payee/number or direct debit reference number.
- A description for what the payment is for. This is shown on the cash receipt for the payment.
- Attach any reference files you have for the payment. These will be saved with the transaction for your records.
- Optionally record this payment in the “Marketing – fund received” or “Contracts – deposits processed” ledgers, if you are using those ledgers for this property.
A cash receipt is automatically generated after saving the transaction. A PDF copy of the receipt you can print or email to the payee can be download.

The new transaction is now visible on the ledger. Things to note:
- The first column shows the audit number of the transaction. All transaction entered into the system are allocated a sequential transaction number for auditing purposes.
- The payment details and book date can be toggled by clicking on the transaction type.
- The cash receipt can be viewed by clicking on the receipt number.
![]()
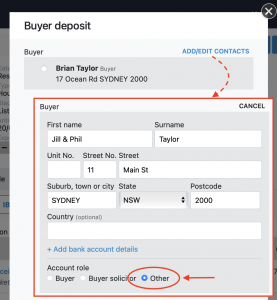
Receiving payments for a vendor/buyer from a third party
If you receive a payment for a third party supplying funds for a vendor/buyer, add them as a contact and continue as above.
For example; if a partner or parent provides funds for the buyer of a listing, add them as a contact when receipting the funds and set the account type to other.
Disbursing funds
Click the Disburse Funds menu and select between disbursing to the buyer, agency or vendor.
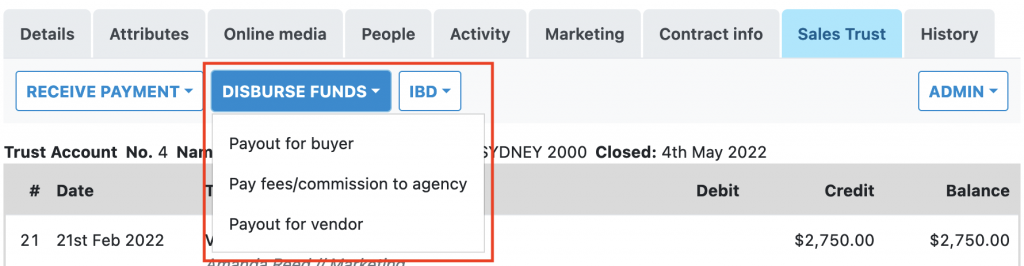
Enter the transaction details for the disbursement:
- Select the vendor/buyer contact that is receiving the disbursement. When disbursing to the agency the contact is set to the agency details.
- Enter the transaction date, this is the date the payment occurred on your bank statement. The system will automatically record a book date for the transaction as well based the current date.
- Record whatever payment details you have for the transaction, such as a cheque payee/number or direct debit reference number.
- A description for what the disbursement is for.
- Attach any reference files you have for the disbursement. These will be saved with the transaction for your records.

Disbursing payments for a vendor/buyer to a third party
If a vendor/buyer request that you release their funds held to a third party, add them as a contact and continue as above.
For example; if a vendor wishes to have their funds disbursed to their solicitors, add the solicitor as a contact when disbursing the funds and set the account type to other.

Reversing an incorrect transaction
If there is an error with a transaction that has been entered onto the ledger, you can reverse this transaction out and re-enter it with the correct details.
Note: in accounting you cannot delete transaction once it has been entered into a ledger. Rather you create an “reverse” transaction to cancel out the effect or the incorrect one.
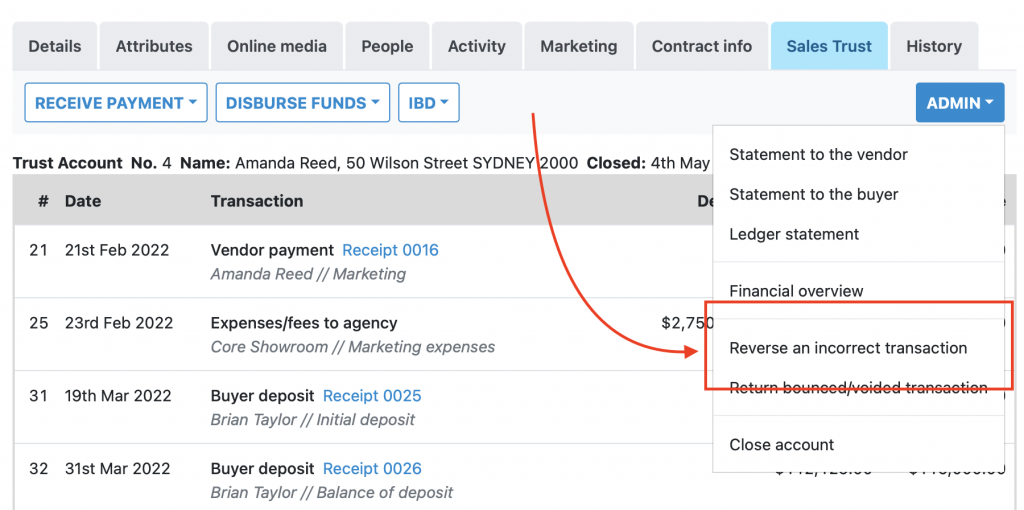
Select the transaction you want to reverse, and enter a description of what the correction is for:
![]()
A reverse / opposite transaction will be add to the ledger to cancel out the incorrect transaction:
![]()
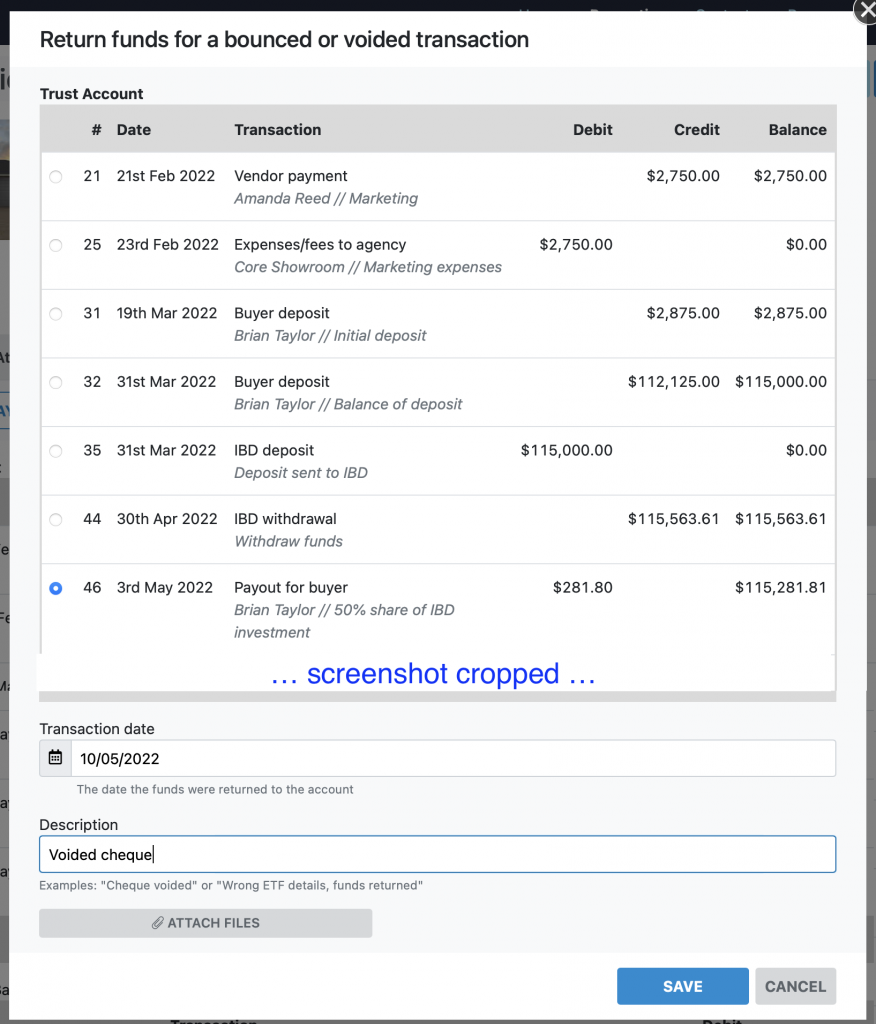
Returning funds for a voided or bounced cheque/direct debit
If a transaction you have added to the ledger bounces, and the funds have been returned to your account, you can re-add these funds to your ledger by recording a “returned” transaction.
This feature can be used to process a cheque that was recorded on the ledger which was later voided or bounced. Or, for a direct deposit or debit that was incorrect and the funds recovered or returned.
![]()
Select the transaction whose funds were later returned to the trust account. Enter the date the funds were returned and a description. If have a reference number for the transaction you can add this to the description.
A “returned” transaction is added to the ledger:
![]()
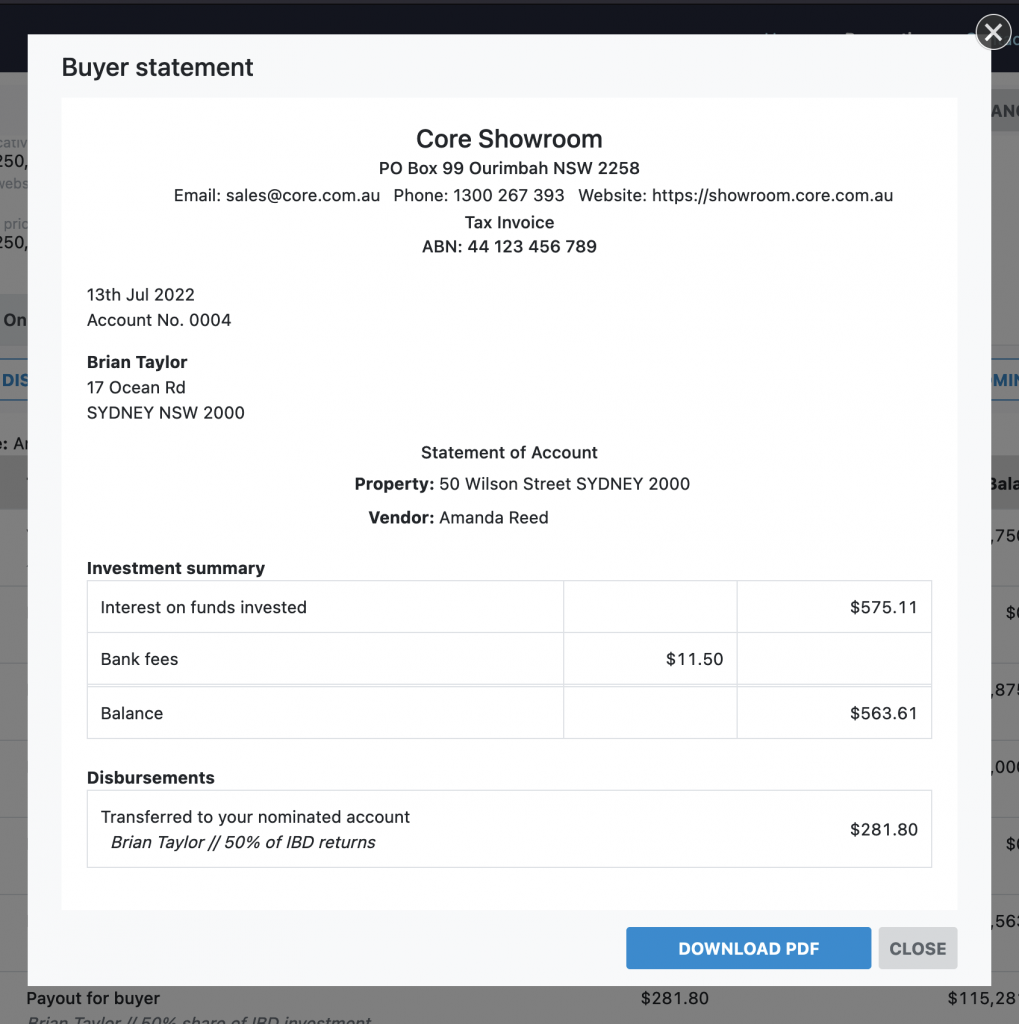
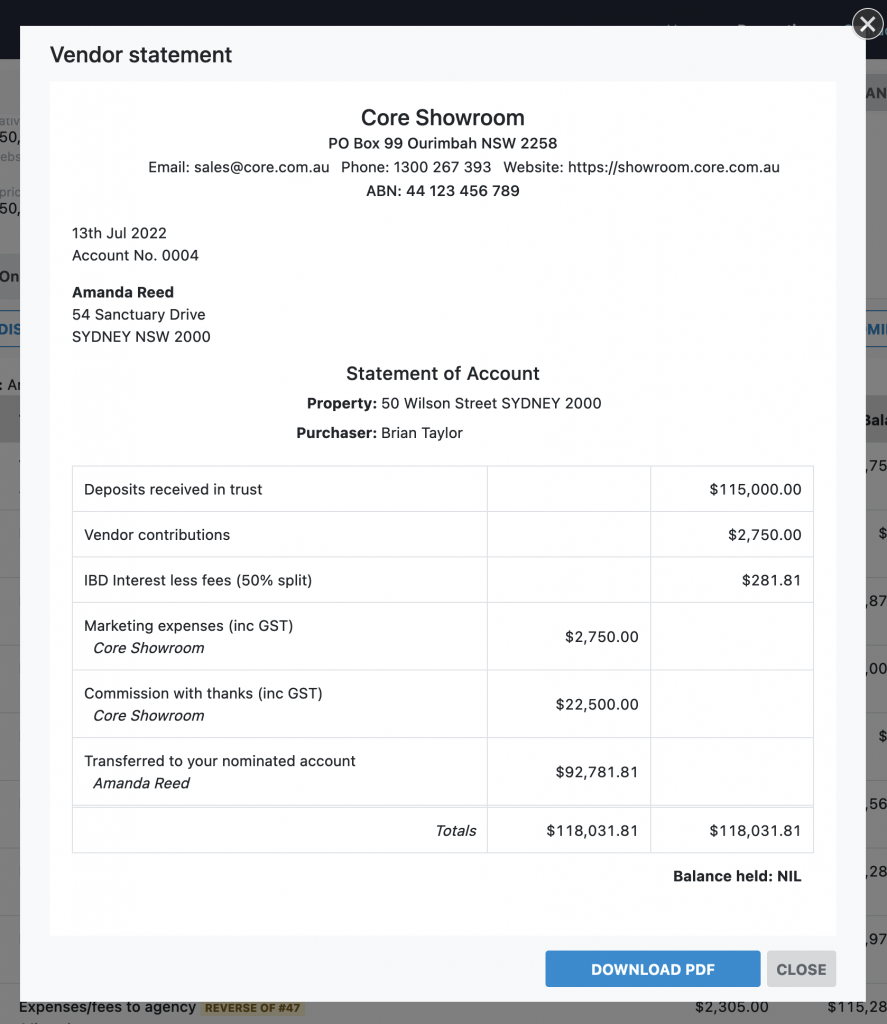
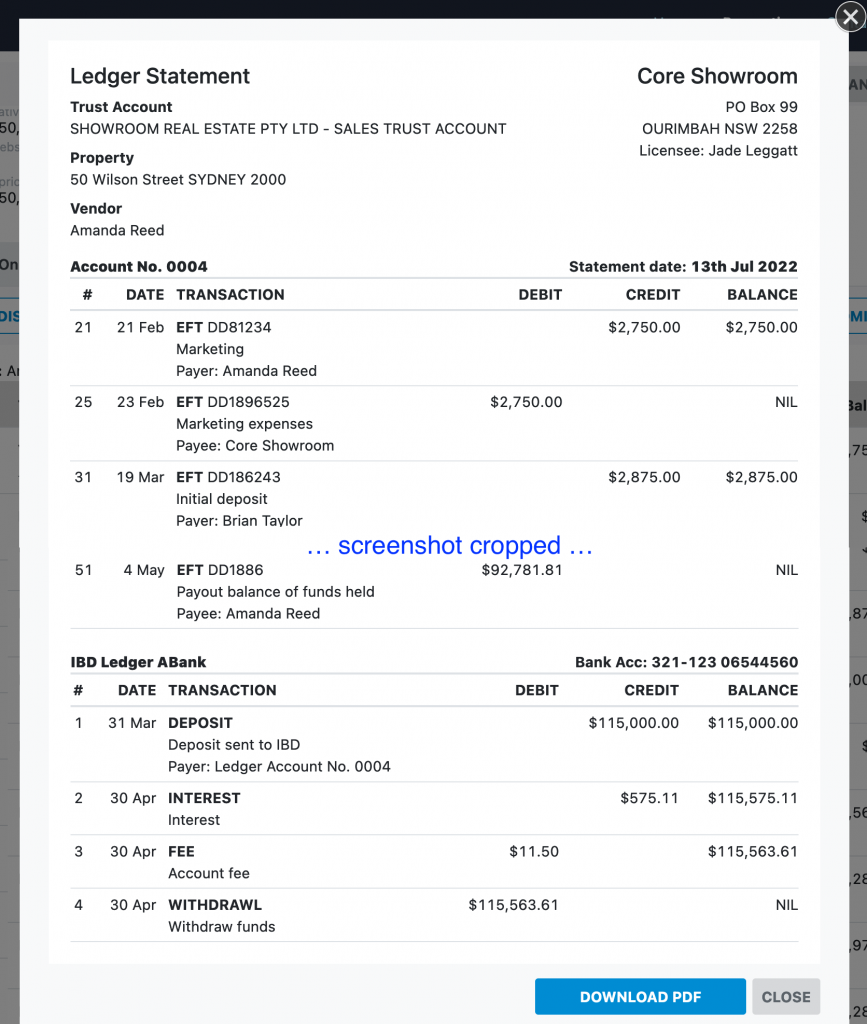
Ledger reports
Automated reports are available for the buyer, vendor and a ledger statement. You can access these reports via the admin menu.
These are based on the details entered into the ledger.
- Buyer statement
- Vendor statement
- Ledger statement
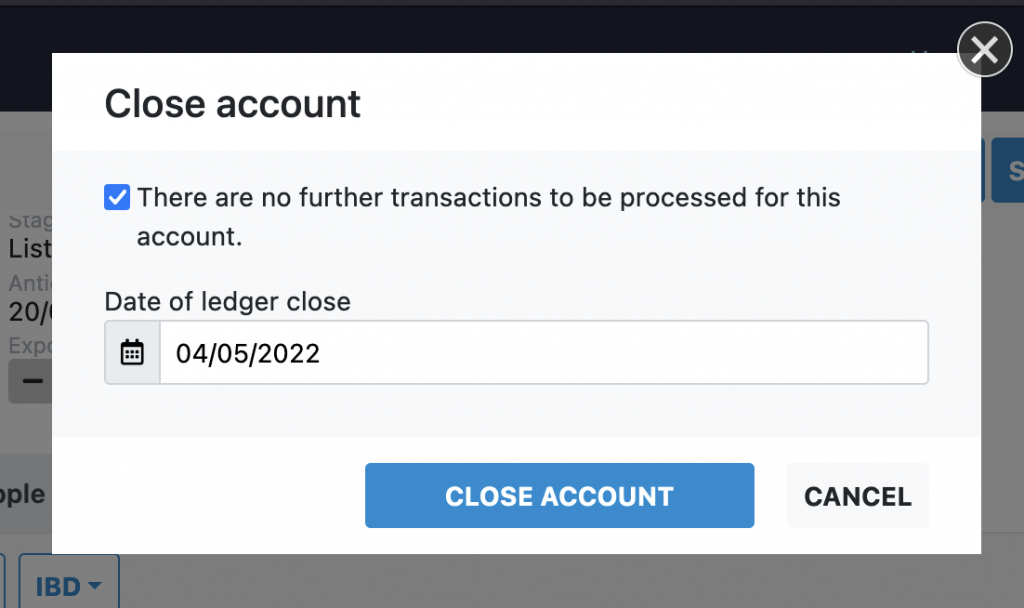
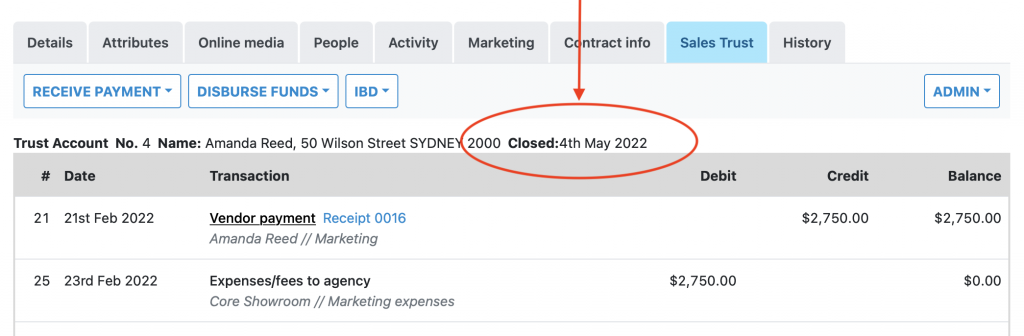
Closing a ledger
Once the all the funds have been disbursed from this ledger you can close the ledger. Open the Admin menu and click on “Close account”. Enter the date the ledger was closed, typically the date of the last transaction. The close date will be shown next to the property ledger.
It is not possible to add further transactions to a closed ledger.
IBD Accounts
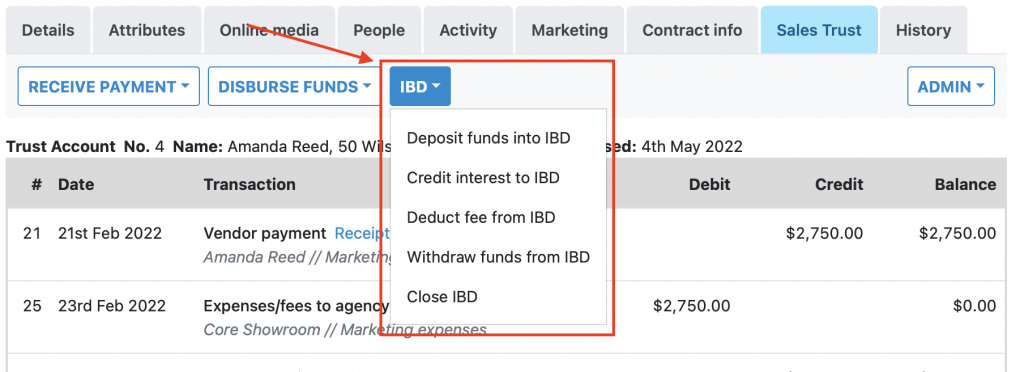
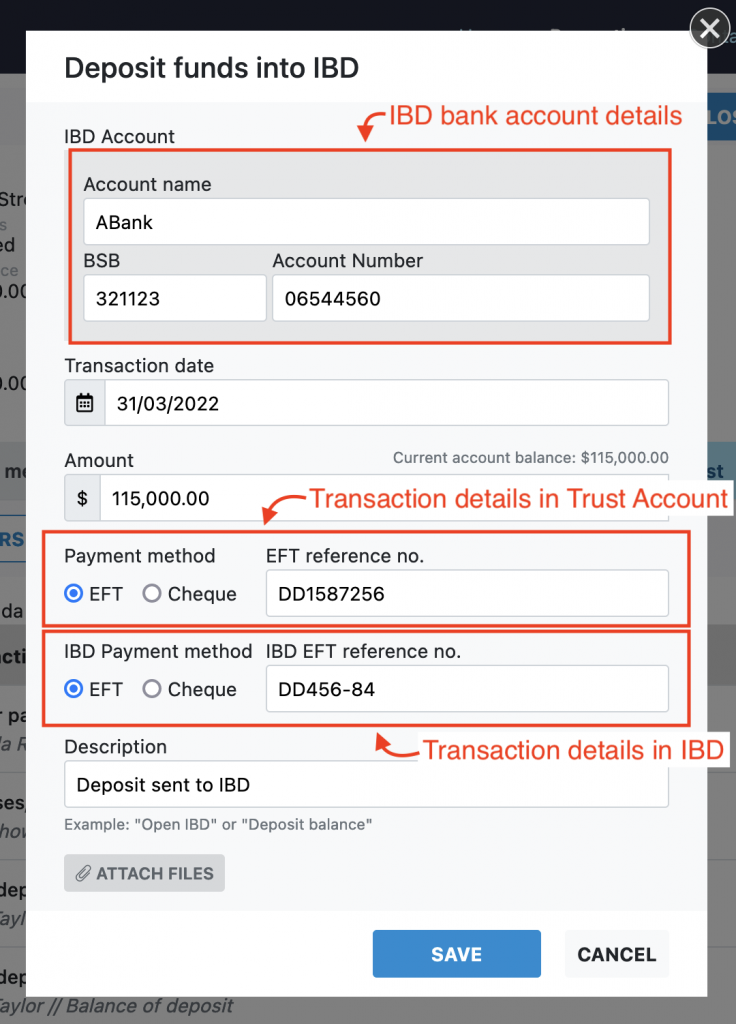
Deposit funds into an IBD
Open the IBD menu and select “Deposit funds into IBD”.
Enter the details for the new IBD account and the initial deposit:
- Enter the IBD account name, bsb and number. If you have previously created an IBD account for this listing you will be given the option to deposit into an existing account or create a new one.
- Transaction date
- Amount
- The payment/transaction details as they appear on the trust account
- The payment/transaction details as they appear on the IBD account
- A description
- Attach any reference files you have for the payment, e.g. order on the agent, bank account paperwork. These will be saved with the transaction for your records.
The funds will now show as withdrawn from the trust account and deposited to the IBD ledger.
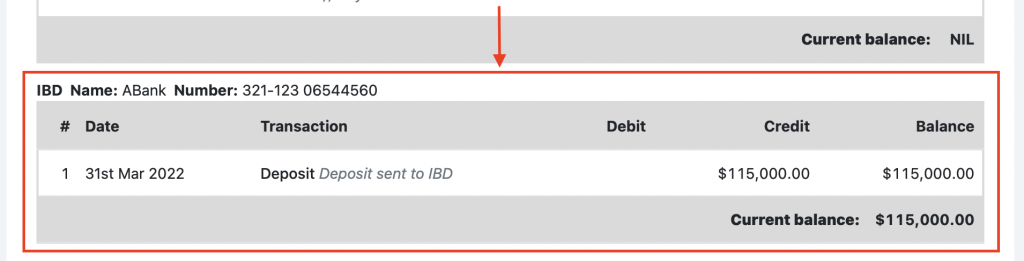
A new ledger will be opened for the IBD account. This account will be visible at the bottom of the trust accounting tab:
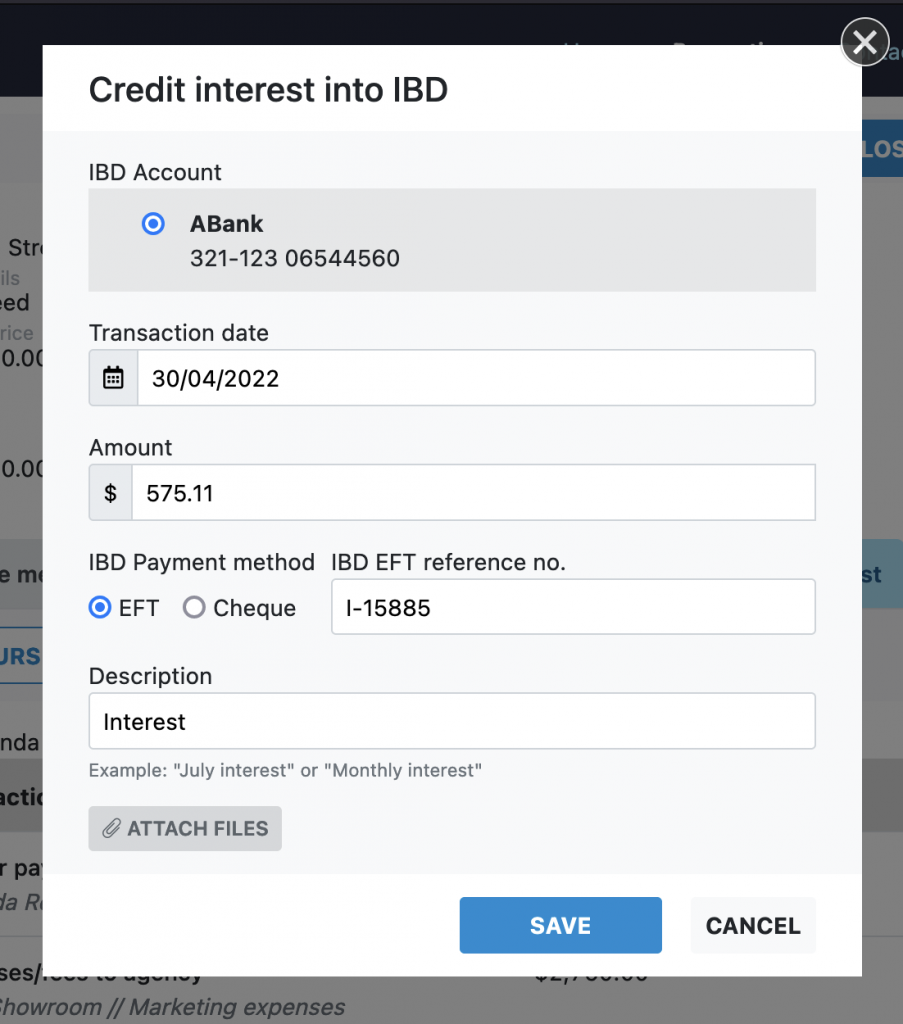
Credit interest to IBD
To record an interest payment into the IBD, open the IBD menu and click on “Credit interest to IBD”. Enter the details of the payment:
- Select the IBD account to credit the interest to. In most cases there will only be one IBD account to credit and it will be pre-selected.
- Enter the transaction date, amount, payment details and description as normal.
- Attach any reference files for your records.
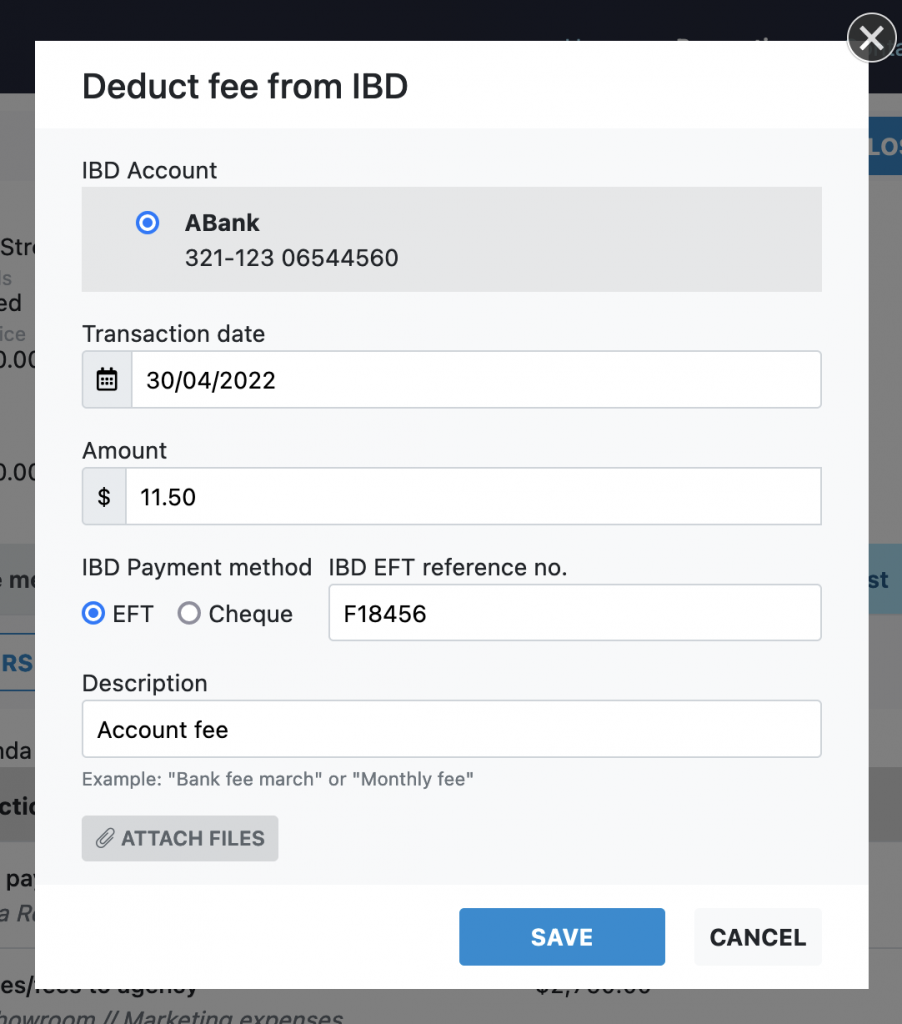
Debit fees from IBD
To record a deduction of fees from the IBD, open the IBD menu and click on “Credit interest to IBD”. Enter the details of the deduction:
- Select the IBD account to deduct fees from. In most cases there will only be one IBD account to debit and it will be pre-selected.
- Enter the transaction date, amount, payment details and description as normal.
- Attach any reference files for your records.
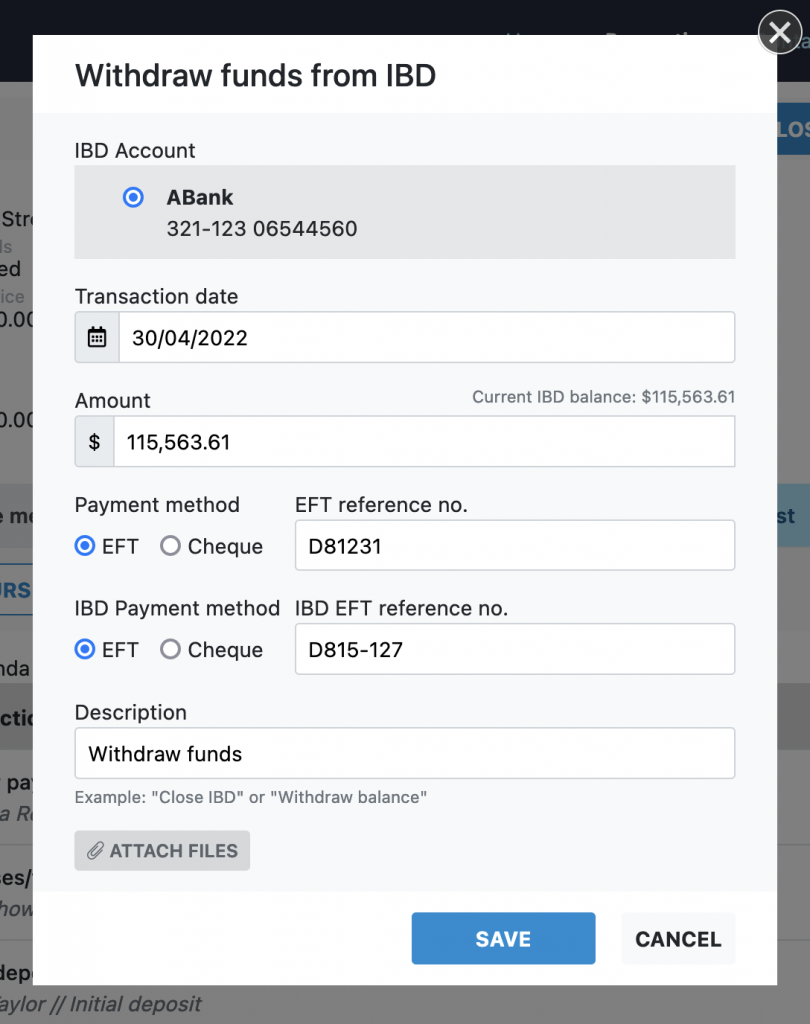
Withdraw funds from the IBD
To move funds from the IBD back to the trust account, open the IBD menu and click on “Withdraw funds from IBD”. Enter the details of the withdrawal:
- Select the IBD account to credit the interest to. In most cases there will only be one IBD account to credit and it will be pre-selected.
- Enter the transaction date, amount and description as normal.
- The payment/transaction details as they appear on the trust account
- The payment/transaction details as they appear on the IBD account
- Attach any reference files for your records.
The funds will now show as withdrawn from the IBD and deposited to the trust account ledger.
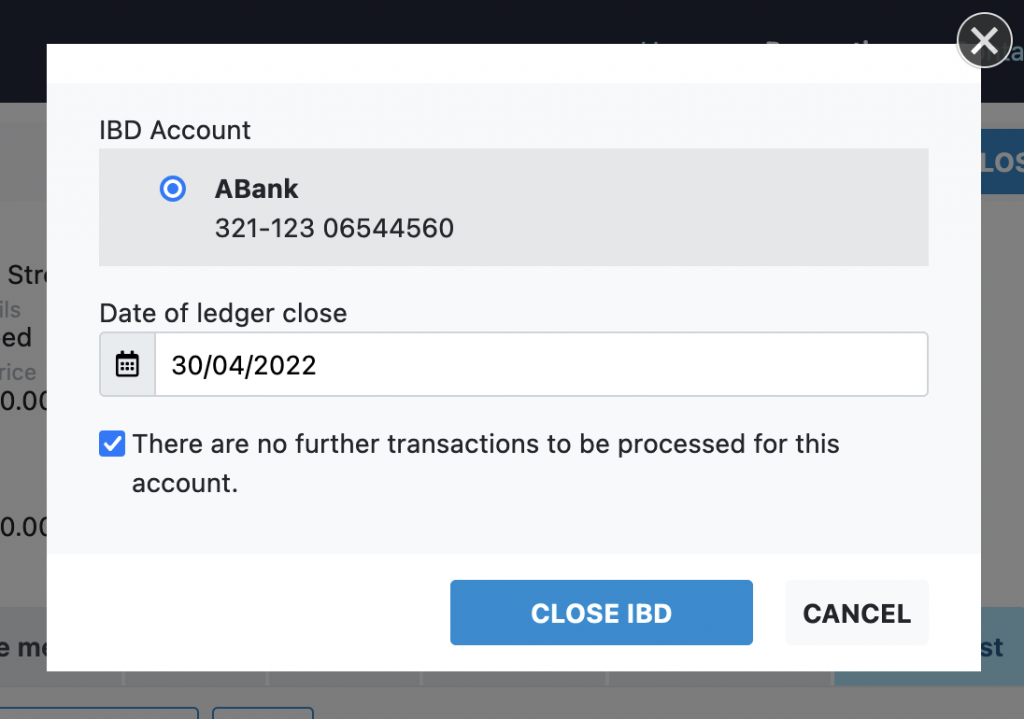
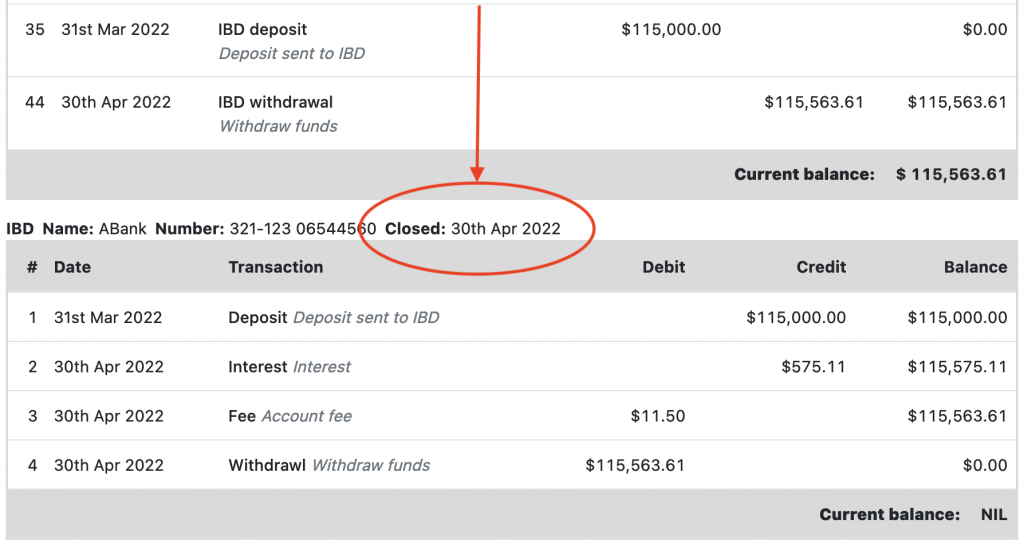
Closing an IBD
Once the IBD account has been closed you can close the associated ledger. Open the IBD menu and click on “Close IBD”. Enter the date the account was closed. The close date will be shown next to the IBD ledger.
It is not possible to add further transactions to a closed ledger.