
Purpose
The Properties page is designed to help you manage everything related to current and prospective properties. You can create new or edit existing properties here. Selecting a property, by left clicking it allows you to use the Actions, Activites, Marketing, Admin and Reports menus on the left. Double clicking a property opens up to its Details tab and gives you access to the other tabs detailed below
The Top Property Menu

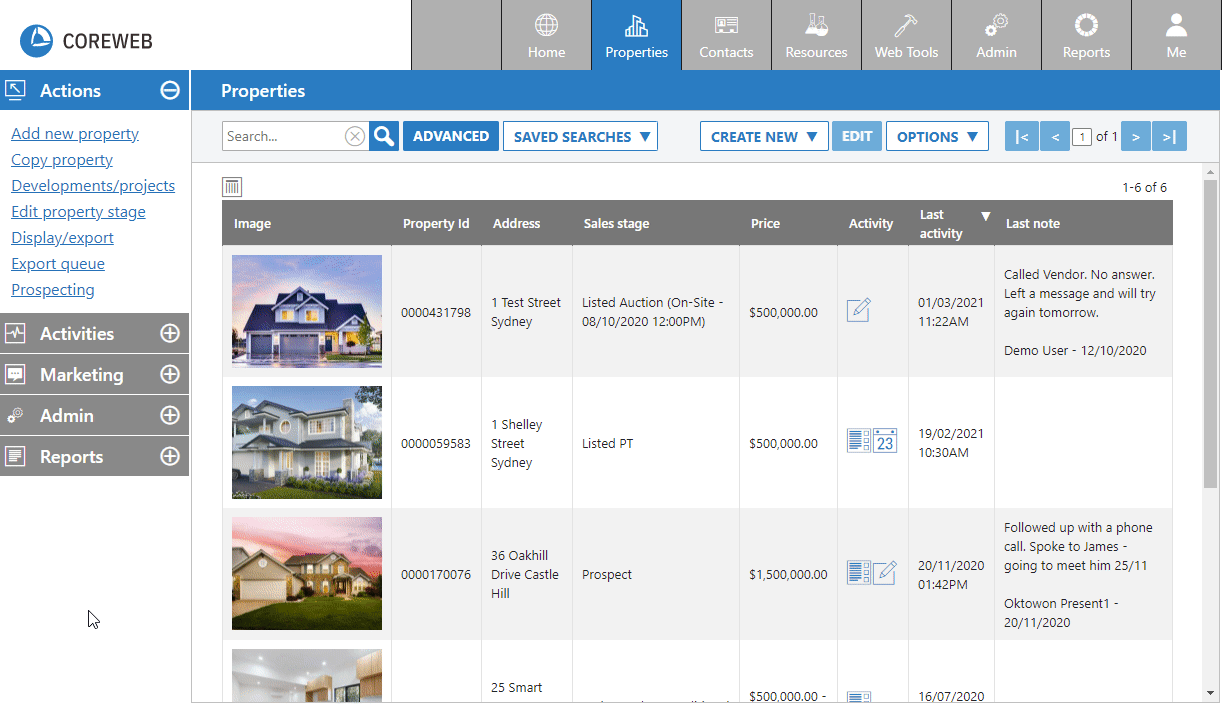
Search and Advanced Search
On the left hand side is the Search box with the option of Advanced functionality. Searching within the box will check the properties for matching words. This box is typically used for typing a properties address, or the Property ID. An advanced search allows you to filter the Property List based on selectable criteria such as the Sales Stage, Property Type, Property Category, Suburbs and numerous date fields. Once you’ve chosen this criteria, hit OK and your Property list will be filtered accordingly.
A separate feature of the Advanced search is the ability to save frequently used attributes to quickly find what you are looking for. As an example, you might want a saved search for all of your currently Listed PT, Residential properties. To create this:
- Click the Advanced button
- Select only Listed PT and Residential For Sale
- At the bottom left of the window, give your search a name and press OK. The search is now available to you in the Saved Searches menu.
A video of this can be found below:
Create New, Edit and Options

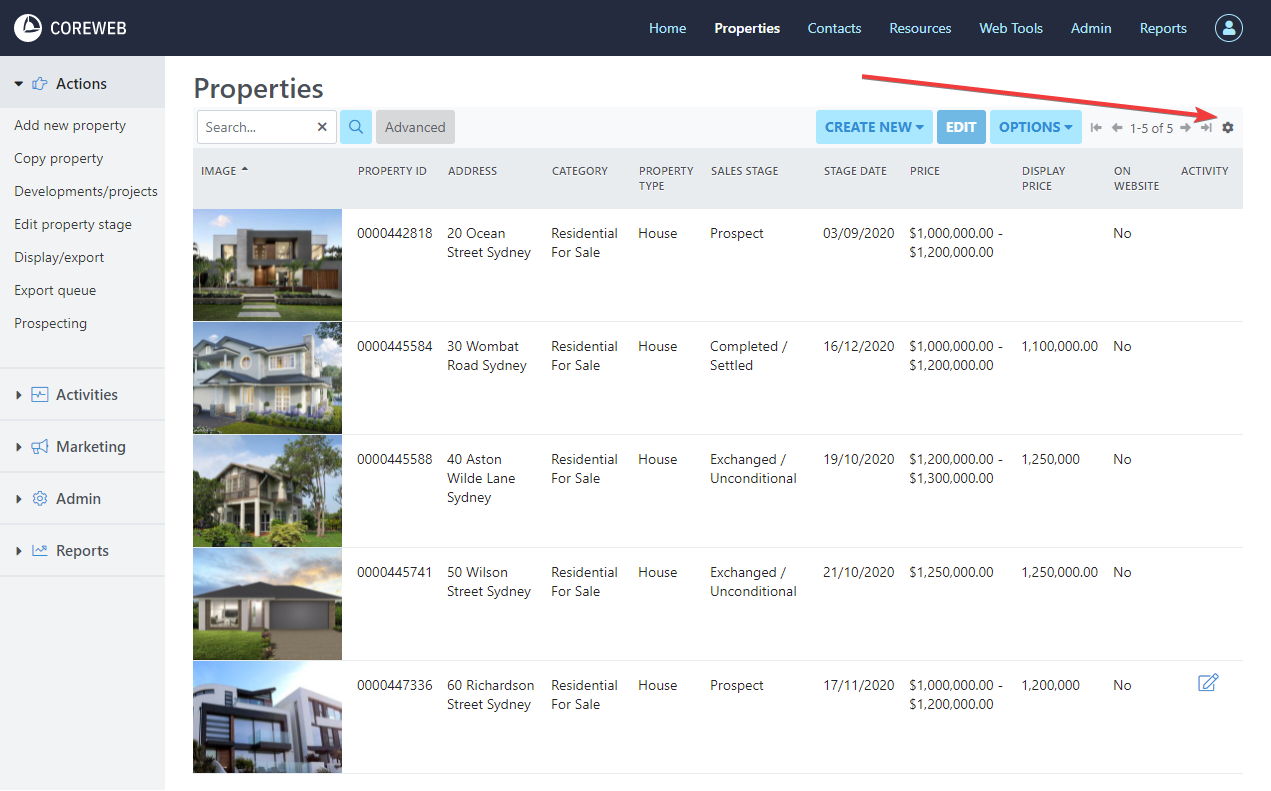
On the right hand side of the Top Property Menu you have the ability to “Create New” properties, this occurs in the same way as adding a new property via the Action Menu. Here you can also Edit properties after selecting them, or via the Options menu you can export the entire list as a CSV (spreadsheet). The Options menu also gives you the ability to print out your Property QR codes for a given date range. Instructions on this below:
Printing Bulk QR Codes
To save time ahead of an OFI you can bulk print upcoming OFI QR codes. You are able to choose to print based on sales or lease, by date or by User.
- From within the Properties Menu, click Options and select “Print QR Codes”
- Select the date range for the OFIs you wish to print
- Choose whether you want to print for sale, for lease, or both (not a required field)
- Select a User if you only want to show their OFI codes (not a required field)
- Once you have selected the appropriate fields, press the Find button
A new window will pop up with a list of all OFI QR codes displayed based on your above choices. You can now choose to print them from here.
Editing Columns/Changing Your View
At the top left of the Property window, there is an “Edit Columns” button that can be used to add or remove columns from your view. It is helpful to do this as it can give you more real estate to see the things that are of interest to you in your role.
Button location:
- Clicking this button will present you with a list of options in checkbox format for you to turn on or off:
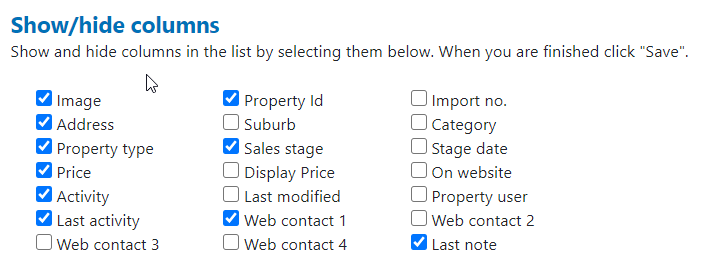
- In this example we’ve turned on “Last Activity” and “Last Note” to show us when the last activity was performed on the property, and the information from the last note. This will also allow us to sort by either of these columns. We will use the Last Activity column for this example. Afer turning on the columns you wish to see, you can save your changes and the view will update:
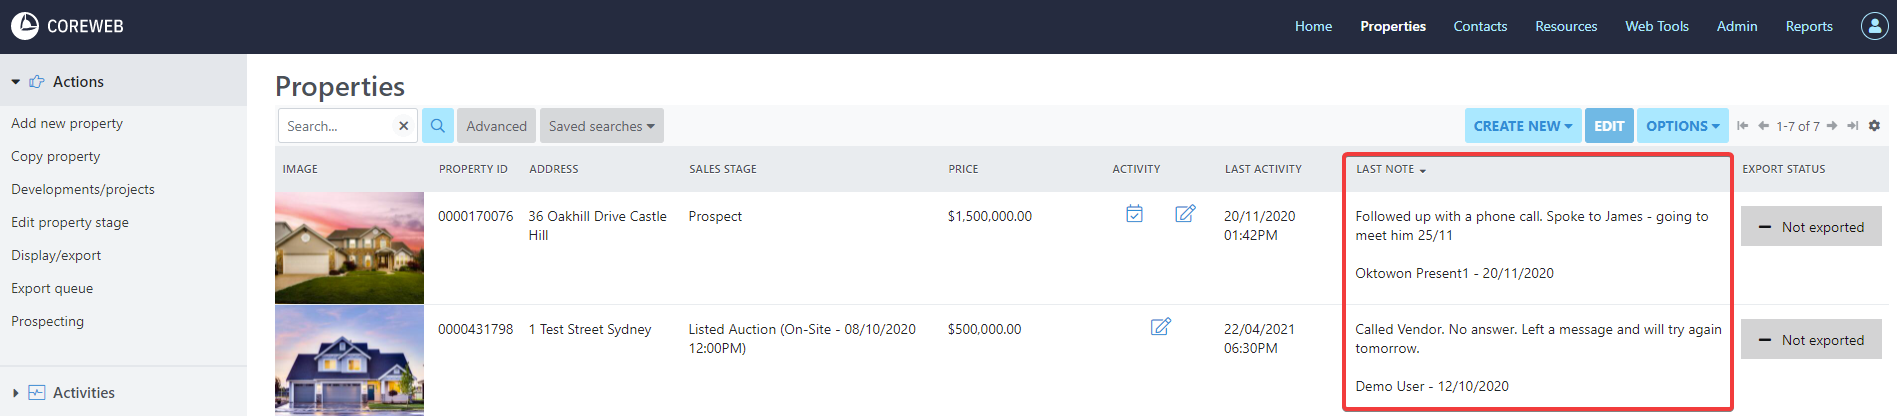
- You can now see the important notes left on the properties without having to open them.
Double Clicking A Property
Details
Purpose
Display a list of all properties under your agency, dependant on your search criteria. Double clicking a property will then bring up all of the relevant information about it, from the address, what category it falls into, the price, vendor details and associated activity etc. New properties are created here.
Instructions
- Double clicking a property will default you to it’s details tab. You will see information already populated from when the property was added. You can modify all of the fields on this screen
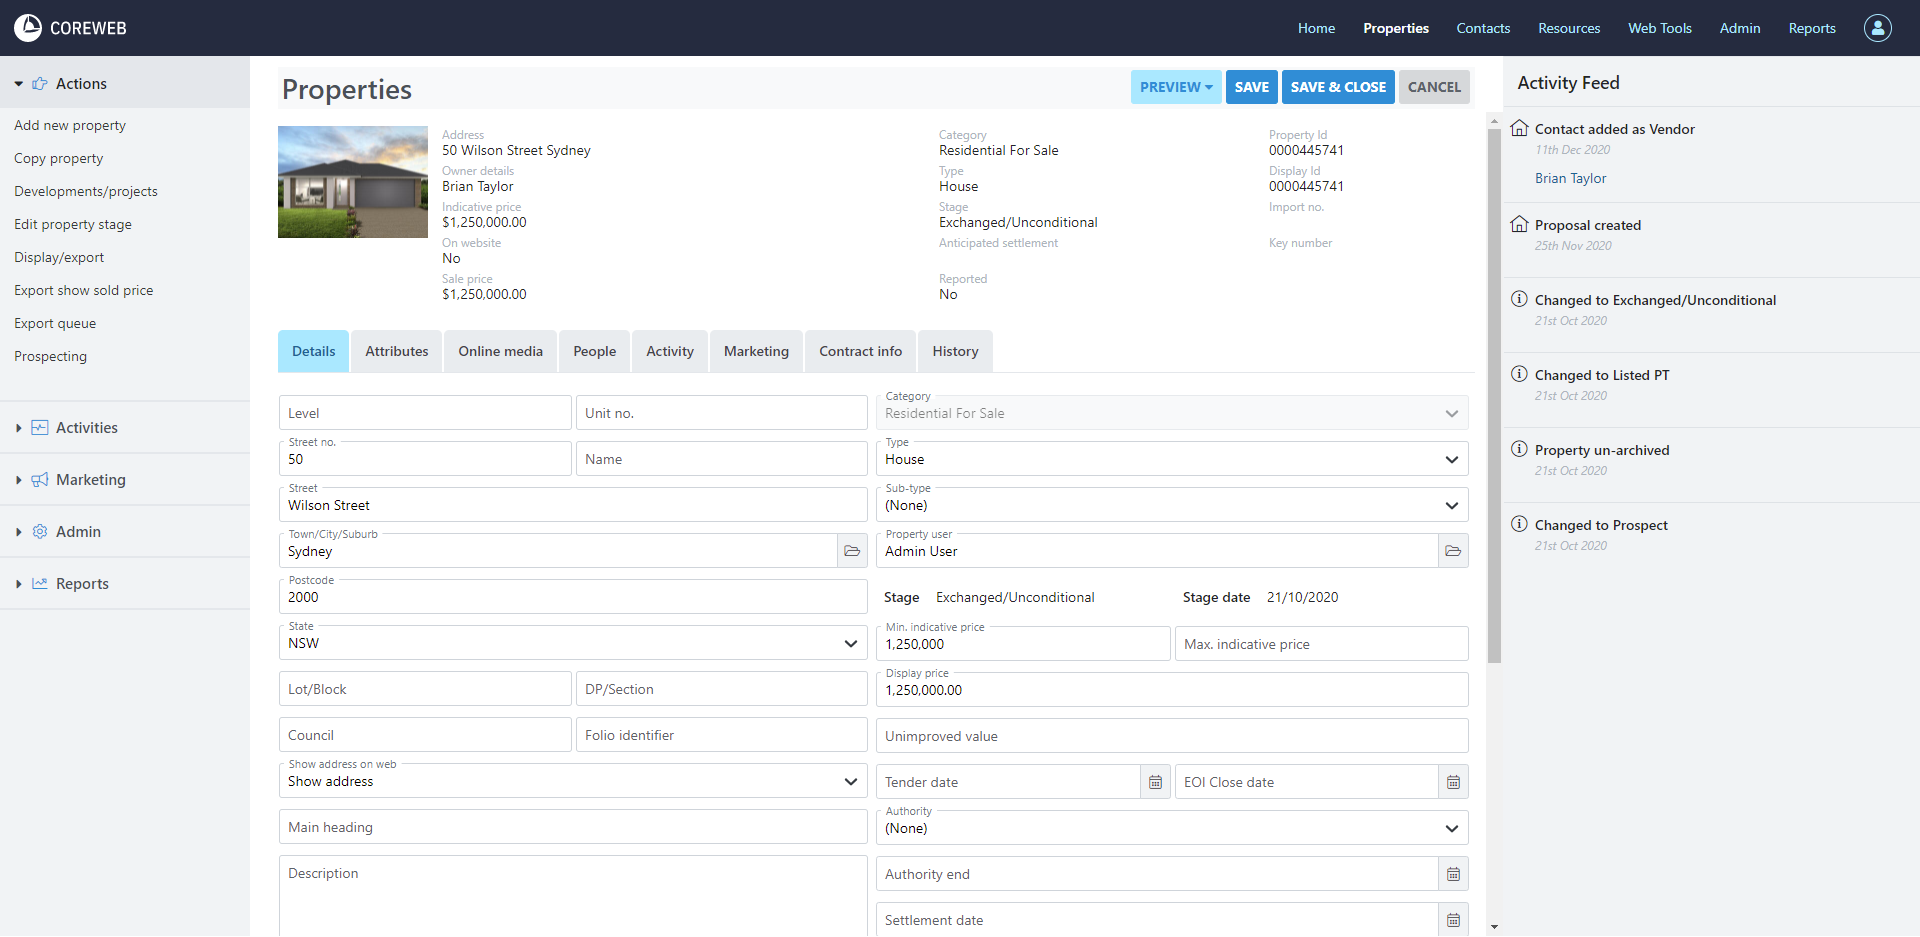
- Once finished editing, click Save if you wish to edit on another tab, or Save & Close to leave the screen.
Note: This screen also includes the “Archive” option. This should be used whenever you want the property to no longer appear in the Core Properties section. Typically you’d use this if you’ve created an accidental duplicate that you don’t want to see any longer. The short video below details the archiving process
Archiving A Property
Attributes
Purpose
To add all of the necessary information regarding the property. This is the screen that will ultimately decide how your listing will look on your linked portals, so make sure you populate as much as you can
Instructions
- Click the attributes tab to see what is already populated for the property.
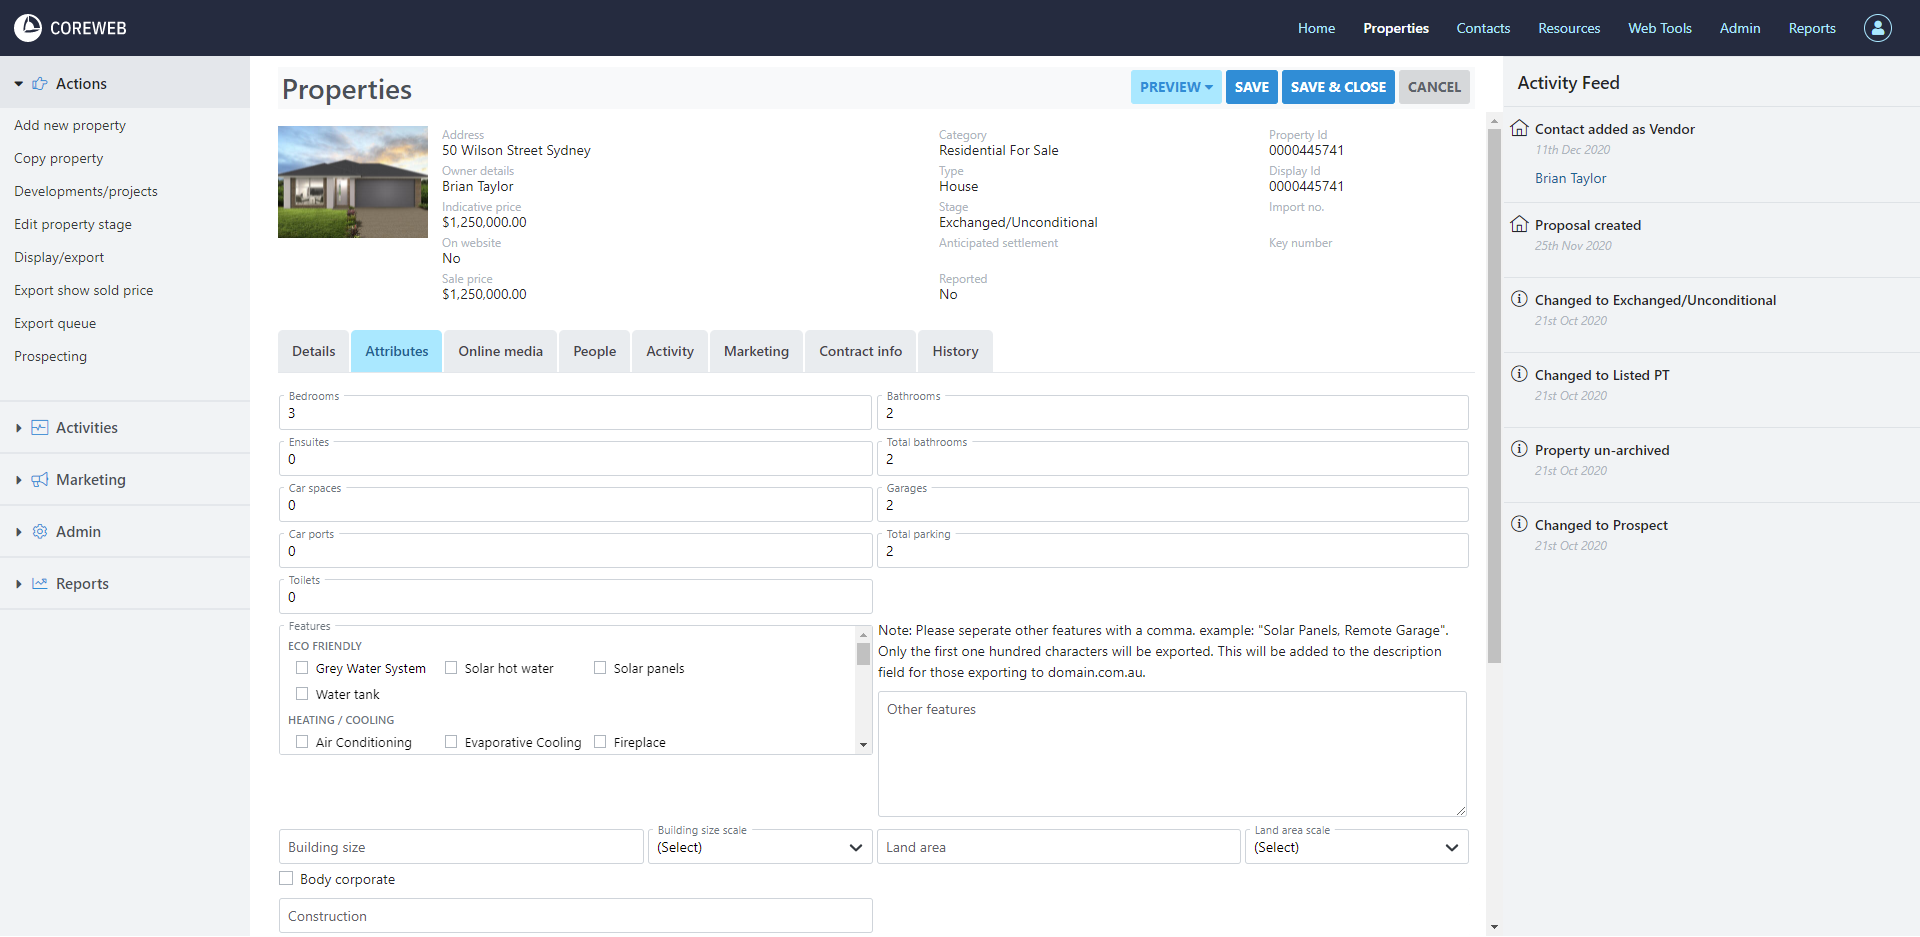
- Fill in all of the information you would like to that pertains to this listing.
Note: The “Features” section is used by your export portal to filter properties based on a user’s search criteria. ie if you tick “Evaporative Cooling” your property will appear in searches with this option selected. It is important to select everything that your property has to maximise search results.
- Once you have finished editing you can click Save to remain in the Attributes screen, or Save & Close to exit.
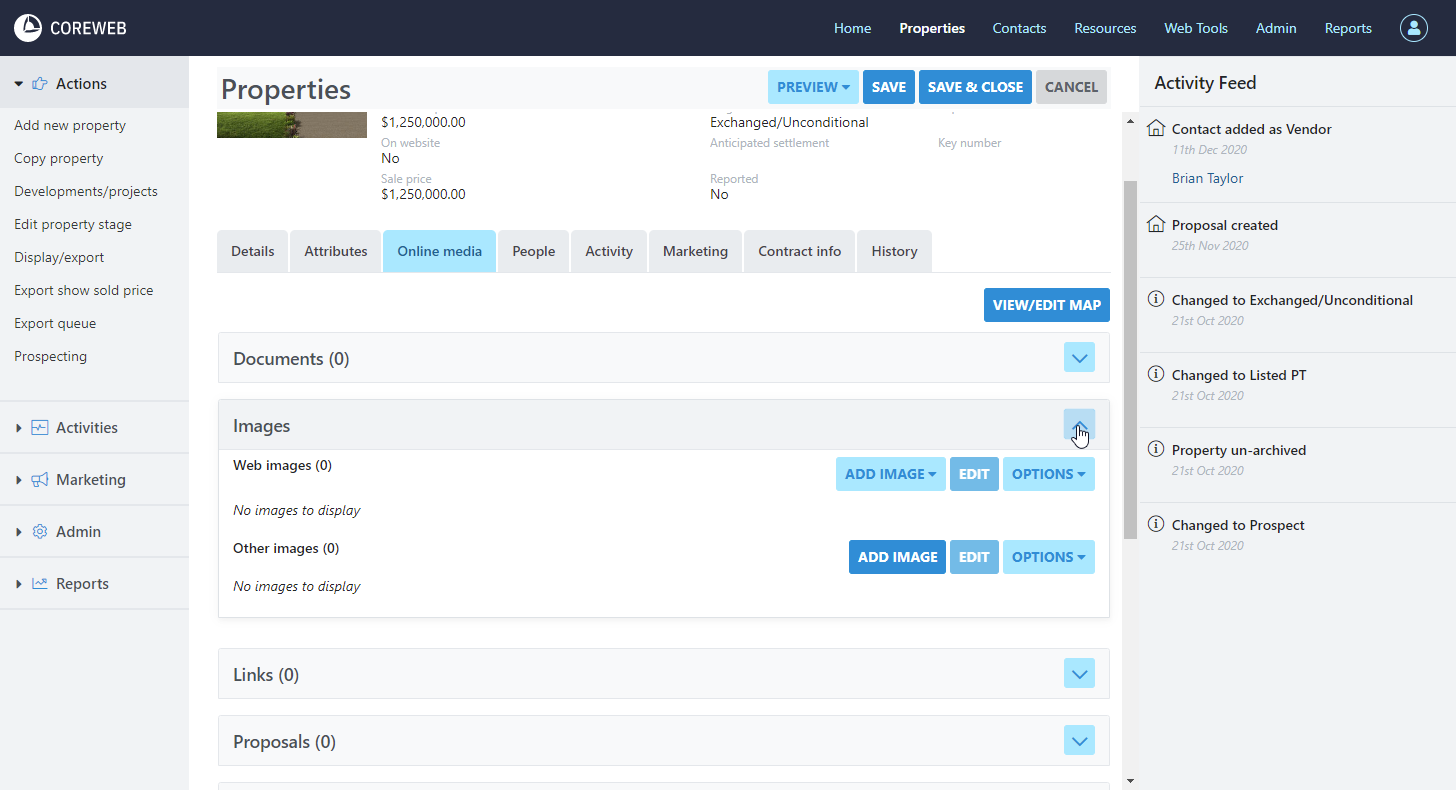
Online Media
Purpose
This space is for you to store documents, images and links relating to the property. This can be used later in other Core screens
A rundown of each section is as follows:
Note that files and links uploaded here are going to appear differently depending on your Agency web site or the Export Portal you are using. This guide will cover them as generically as possible.
Documents: Here you can add any documents relating to the property. Documents are broken down into different types that can cause them to appear in different places on a web site. They are: Standard, Floorplan, Contract, Brochure and Statement Of Information
Images:
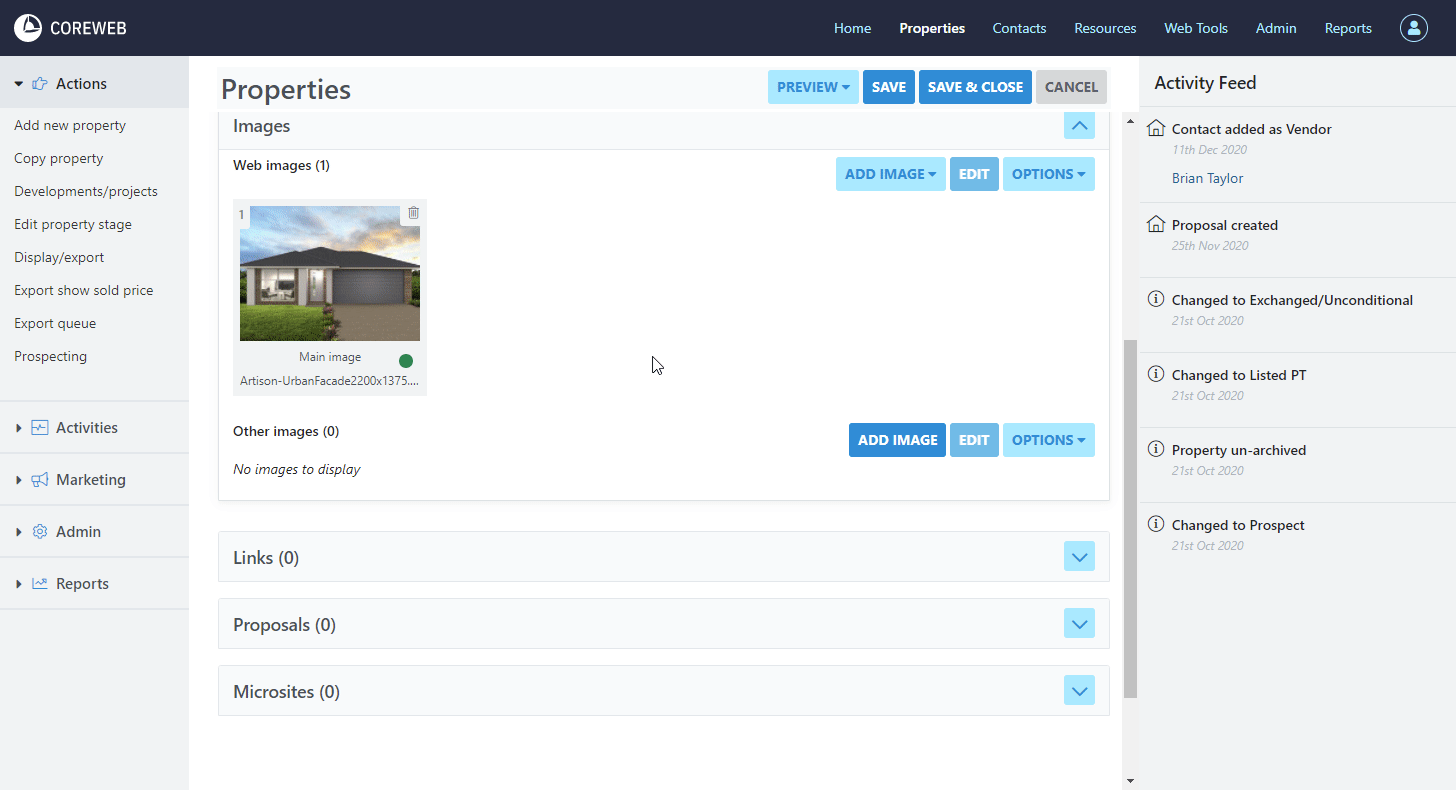
Web Images: This is the main section you will use. Images added here are what will appear on your linked Export Portal. You will typically be adding them as a “Main Image” but can also separate out the Floor Plan
Other Images: A place where images can be stored that you do not want on the web e.g. Window Cards, Brochures etc. You can click and drag images from the main section into the other section if you don’t wish for them to be on the portals any more. This gives you the ability to store images of the property that you might want to place online/take offline but not need to re-upload.
Links: A place for you to add web links that relate to the property. Where they are positioned depends on the setup of your web site, or the export portal you are using. Links are broken down into the following link types:
Website – A link to a different page containing information that might be relevant to the property.
Virtual Tour – Link to a virtual tour. This is usually hosted on another site and is typically a 3D representation of the property and is interactive. It gives potential buyers the ability to virtually “walk” through the property online
Video – Typically a direct link to a YouTube video. This is the preferred method for Virtual Tours showing on realestate.com.au and domain.com.au.
Interactive Floorplan – A link to an external service offering Interactive Floorplans.
Web Book – Link to what is usually a downloadable PDF of the property containing your own content.
Building/Pest – A link to the building and pest inspection for the property.
Strata – A link to the strata report for the property.
Live Auction – A link to external website that offers online, live auctions.
Property Link – This option overrides the default property link in an email and replaces it with what you have entered in this field. ie when a Contact clicks the property in your email, you may want it to take them directly to an online auction instead.
Select the type of link you wish to add and fill in the required details before saving. The fields are free text, so any link will be accepted. Also, of note the Contract, Web Book and Building/Pest links if added will appears as options to send an OFI attendee when using Core Mobile. If they are not populated the options will not be visible.
Proposals: A link to any Proposals associated with the Property
Microsites: A list of any Micro Sites associated with the Property
Instructions
- Click the “Online Media” tab. You will see you have the ability to expand each of the headings on the screen. The screenshot below shows an example of the Images section being expanded.
Example: Adding Photos to a Property
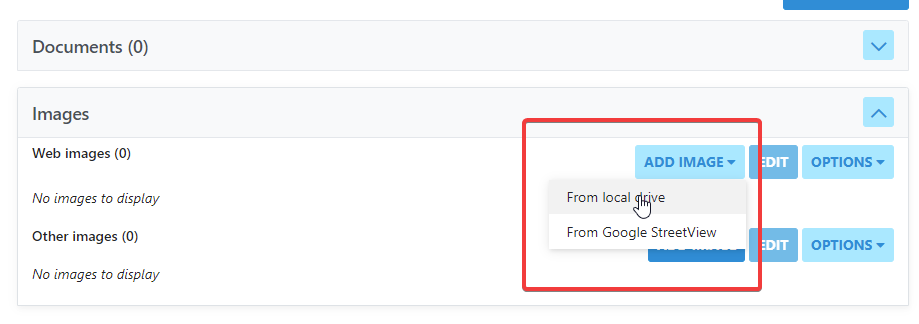
- Expand the “Images” section and click “Add Image(s)”, then select “From Local Drive” from the dropdown menu.
- You will be presented with the following window
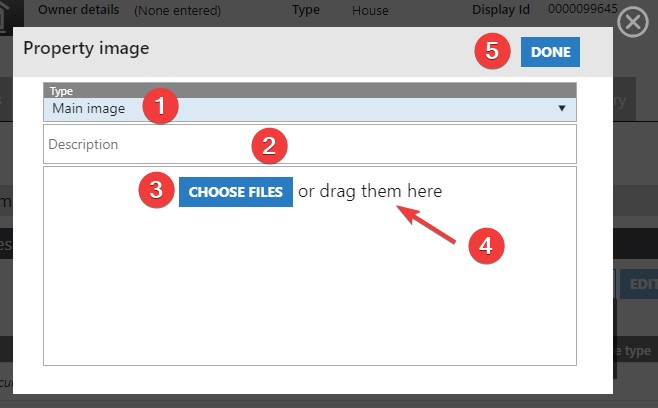
Option Descriptions
- Option to select whether the image you are uploading is a “Main” photo for the property, or a floor plan. You can upload many “Main” images at once but will need to upload a Floor Plan on its own, separately.
- Option to add a description to the image you are uploading. This function will only suit uploading single images at a time.
- The “Choose Files” button will open a window on your computer that allows you to select one, or multiple JPG images to upload.
- An alternative to clicking “Choose Files” is to simply locate the JPG images on your computer’s drive and drag/drop them into this window.
- In this example, we will add a selection of main images to the Property. Select either “Choose Files”, or drag/drop your images into the window. Here we have selected 4 files from a folder. See below:
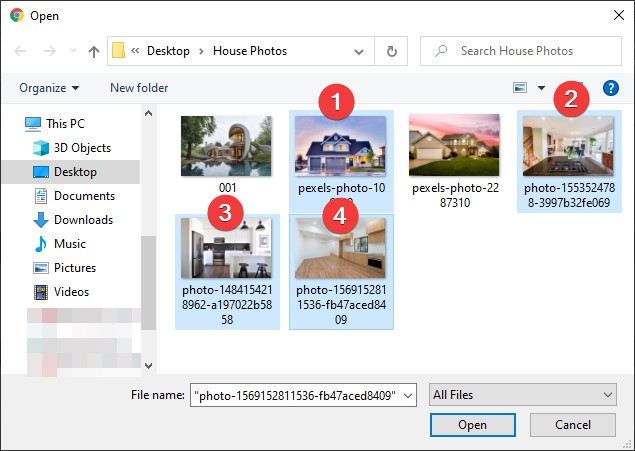
- Once selected, press Open.
- You will now see your selected files get uploaded. As the images upload you will see a spinning wheel as below:
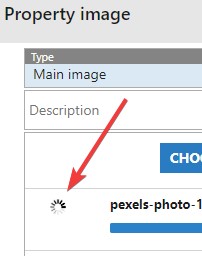
Please note that if you did not select JPG images you will receive an error
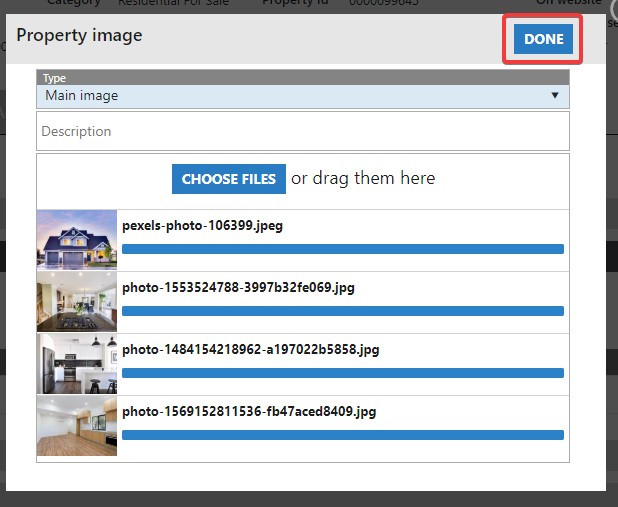
- Once finished, thumbnail previews will appear for the successful uploads. Press Done
- Back at the main Online Media window you will now see a listing of your newly uploaded images. Here you can:
- Move the order of the image by clicking and dragging it into a new position
- Delete an unwanted Image by pressing the trash can icon, or the “Delete Image(s)” option from the Edit menu
- Quality Indicator – Traffic light system to indicate if you’ve met minimum recommended resolution for REA and Domain. Hovering over the light will give you the recommended resolution and show you what you’ve uploaded. The system will still allow you to proceed, but should be considered as a strong warning to obtain a better image.
- Edit its Type or Description. This can also be performed by double clicking on the image. This screen allows you to click its preview to view in full resolution
- Download an image
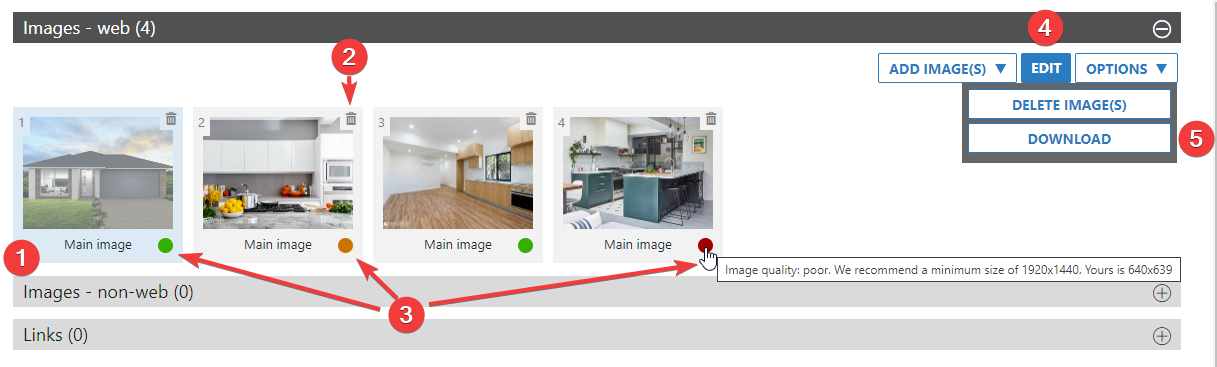
You can also drag an image from Web Images to Other Images. This allows you to take an image offline from the portals, but still have it onhand for the future. You simply drag it back into Web Images to achieve this
Example view after double clicking an image:
From here you can click on the property image to see it in its full resolution
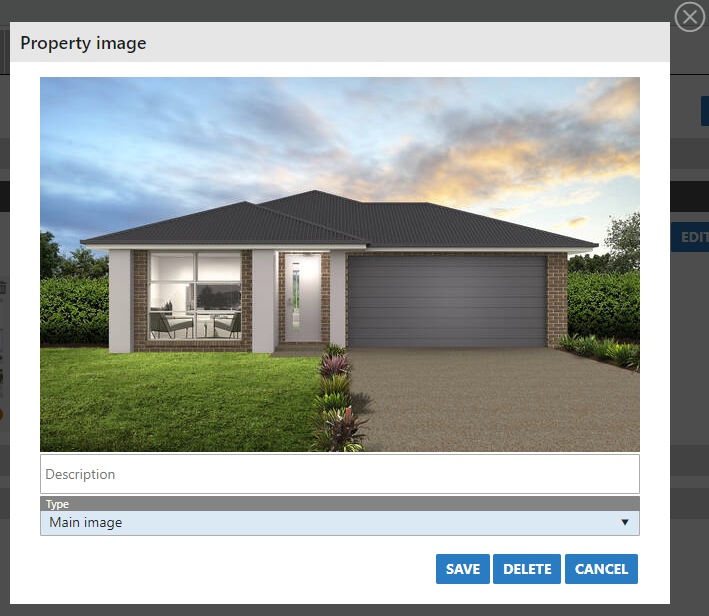
Image re-ordering and deletion :
Click and drag your image to its new position. Use the trash icon at the top right to delete

- Once you are happy with your images and the order they are in, press either Save, or Save & Close at the top right of the window. If you are ready to export, please ensure that you remember to visit Action>Display/Export, then push the property out via the Export Queue.
Example: Adding A Web Book
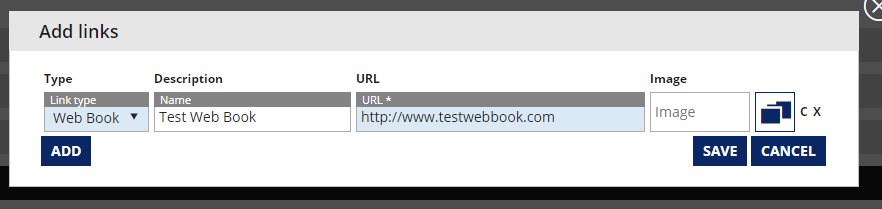
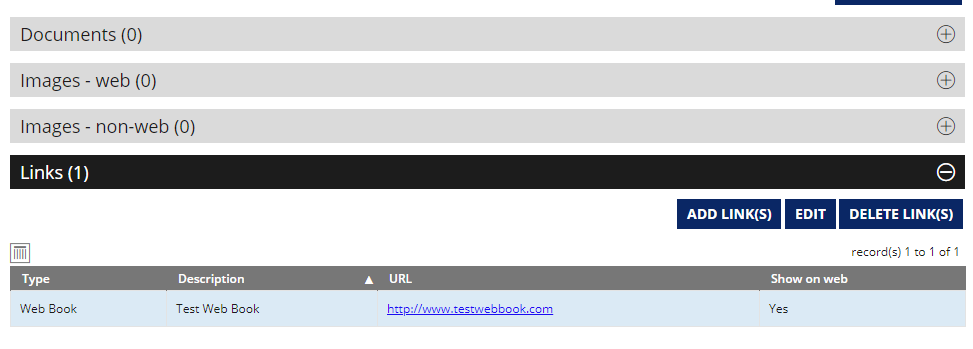
- Expand the “Links” section and click “Add Link(s)”
- Choose the Web Book type, enter a name into the description field, and finally enter a URL. You can choose an image if you wish, but it is likely that your web site or Portal will provide one as part of its theme. Press Save once done.
- Back at the main Online Media you will see your new link. You can add more, edit or delete any links you want to by highlighting them and using the buttons to the right.
- Once you have finished editing you can click Save to remain in the Online Media screen, or Save & Close to exit.
Example: Adding A Virtual Tour or Video
- Click the “Online Media” tab. You will see you have the ability to expand each of the headings on the screen. Expand the Links section
- Press the “Add Link(s) button. A popup window will appear
- Change the link type to Video for a video recording (YouTube etc) or Virtual Tour for an interactive representation of the property. Example below shows adding a Video:

- The only two required fields are the link type, and the URL. The URL is the direct link to the video itself which can be copied from YouTube and pasted into this field.
- Once you’ve entered the correct details, press Save
Note: Clicking Add on this screen allows you to add more than one link at a time, however it is important to understand that if you are exporting to a Portal, it may not support several videos. Typically, only the first link will show.
Note: The process for adding a Virtual Tour is identical, except the Link Type of Virtual Tour is selected instead.
- Once saved, your list of links will appear in the main Online Media section for the property, as below

- Ensure you Save to keep your changes and export the property from the Actions > Export Queue.
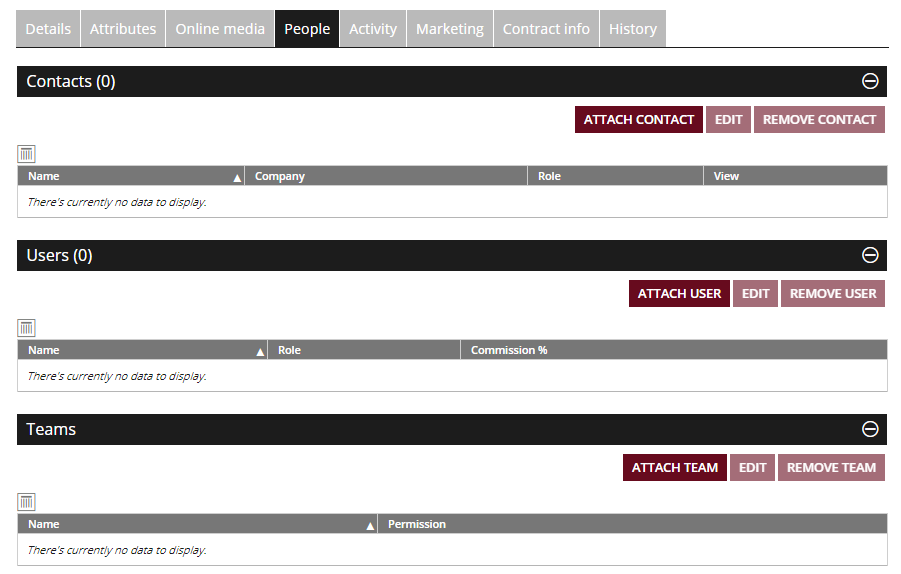
People
Purpose
To associate Contacts, Core Users or Teams with the property. Users tie in with the export portal listing and commission for the property
Instructions
- Choose the Contact, User or Team section you wish to change, then either attach, edit or remove information as appropriate.
- See three videos below with an example of adding each type. Note that it is likely you’ll need to have set up selectable criteria to be able to choose in each of these steps. ie to associate a Team to the contact, a Team would need to have been created prior to this.
Contacts
Preconfigure in Core Web – Admin – User Admin
Users
Preconfigure in Core Web – Admin – User Admin – Users
Teams
Preconfigure in Core Web – Admin – User Admin – Teams
Activity
Purpose
The activity tab is a very powerful area as it shows you everything attached to the property from all of the different areas within the Core system. The Functionality is essentially identical to the Activity tab of a contact. Listed items include:
Open homes – A list of all open homes associated with the property
Open home attendees – A list of all open home attendees associated with the property
Viewings – A list of all viewings of the property by contacts
Registered to Bid – Appears for auction properties. Shows a list of all attendees that registered to bid during an Auction. This is also where you can generate a QR code for attendee registration. A guide on this can be found here
Auction Bids – Appears for an auction property. Shows a list of all bids received during the auction
Enquiries – A list of all enquiries that your agency has received for the property
Contracts issued – A list of all Contracts that have been issues for the property
Offers – A list of offers received on the property
Property inspections – Any property inspections that have been done on the property
Notes – A notes section for anything you wish to document that don’t fit into other areas
Letters – Any documents or letters associated with the property. This has a variety of customizable uses.
Tasks – Any tasks that have been set against the property
Diary – Any diary items that are listed against the property
Not only are you able to see all of this activity in one screen, you can add to or edit these individual items here as well
Instructions
- Click the Activity tab. You will see the screen below. Expand the section you want, then double click the item to open it. In this example the property had some Open Homes associated with it
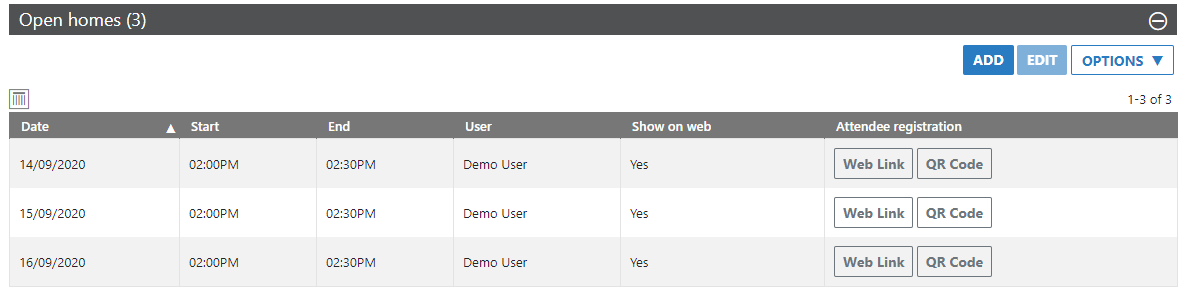
- This particular screen has some extra functionality in the way of QR Codes for Open Home Attendees. This is covered in a separate article > Add Open Home
- Once done you can press Save to remain in the Activity tab or Save & Close to exit
Marketing
Purpose
The Marketing section is designed for you to be able to capture financial information on the cost of marketing the property. There are 3 main sections:
Marketing Plan – The Plan is a way to build a “package” that you can sell the client. A plan is typically made up of multiple Products. The higher the tiered plan, the more products it contains – the client pays a premium as they move up the tier. Under the marketing plan you can choose to add a plan, add product, or both. Marketing Plans need to be pre-configured via the Admin > Marketing Admin > Marketing Plans section
Marketing Funds – To capture both the agreed marketing budget allocated to the property, and also the amount of funds received from the vendor
Marketing Invoices – Here you can create invoices to send to the vendor. The dollar amounts in these invoices do not count toward the automatic calculations being performed in the Plan and Funds sections. This area purely gives you the ability to add in details and create PDF documents to be able to email quickly and easily.
Marketing Plan Instructions
- Expanding out the Marketing Plan section gives you the ability to add either a pre-configured “package” that has been previously defined, or you can add marketing items individually. Press the Add button to start
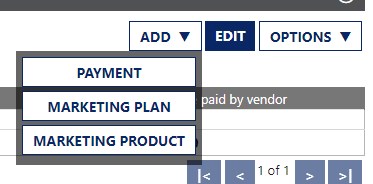
- Select Marketing Plan if you have presented and agreed on this with your vendor, then choose the particular package that you want. In this example we will choose Campaign 1 that has already been set up
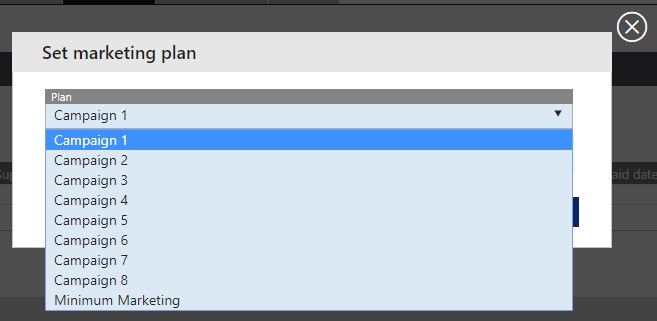
- Select the “Marketing Date” that you wish for the marketing period to start then press Save
- You will now see the contents of your pre-configured “plan” appear similar to below
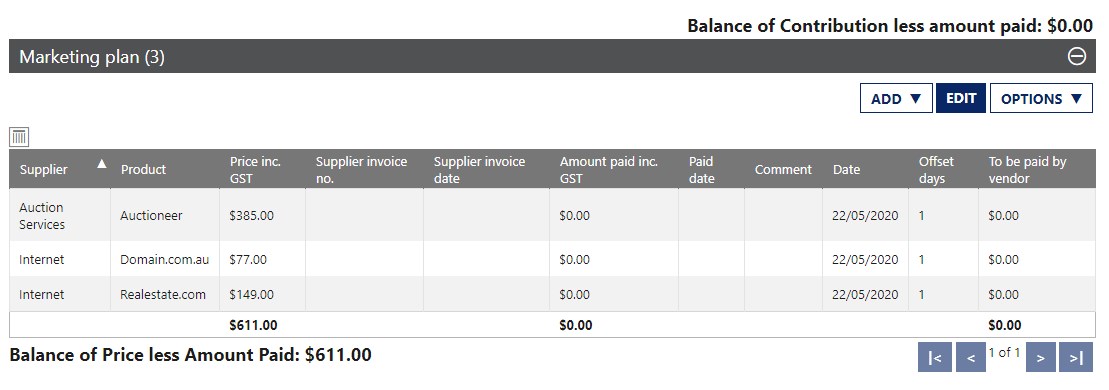
- A breakdown of each section is as follows
Supplier – Supplier Name.
Product – The name you have given the the product.
Price in GST – The price of the product inc GST.
Supplier Invoice No – The supplier’s invoice number, if any.
Supplier Invoice Date – Supplier’s invoice date.
Amount Paid Inc GST – The amount that your agency has paid for the product so far. See adding payments.
Paid Date – The date that you last made a payment.
Comment – Any comments/notes that have been added against this product.
Date – The date set for the marketing to commence.
Offset Days – The amount of days offset from the original marketing date that the product should start ie if you want to run the marketing in stages, entering the number 7 would stage this particular component to run 7 days after the marketing date.
To Be Paid By Vendor – If agreed to be less than the “Price in GST”, the amount you’ve agreed the Vendor will pay for the marketing product.
- Once the products have been populated you do have the ability to add new ones individually (via the Add > Marketing Product selection), delete (via the Options menu), or edit them by highlighting one and pressing Edit.
- After your plan is set, the next thing you will likely do is start recording payments that you have made to the suppliers. To do this, highlight a line item and press Add > Payment. In this example we will make a payment on the Auction Services item.
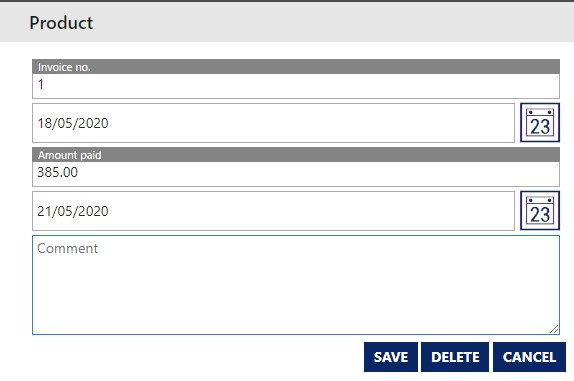
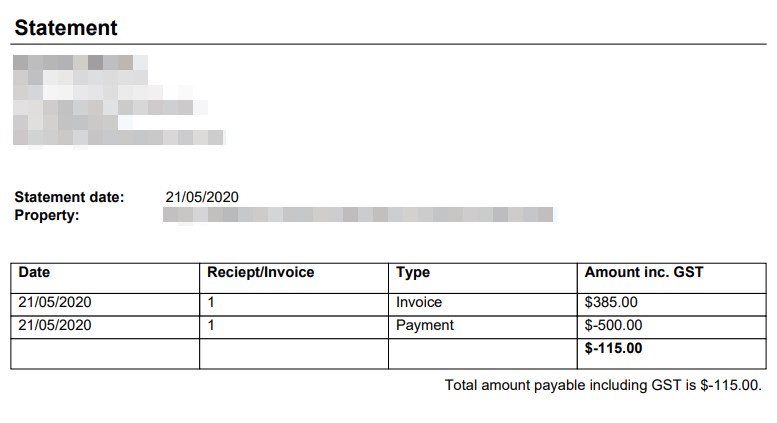
- The invoice for this Product is $385.00 and we are going to pay the entire amount. Once all required details are entered, press Save
- The main window is updated with our changes and shows that we have paid the full amount. It has also recalculated the balances so that you have an up to date view of where the money sits.
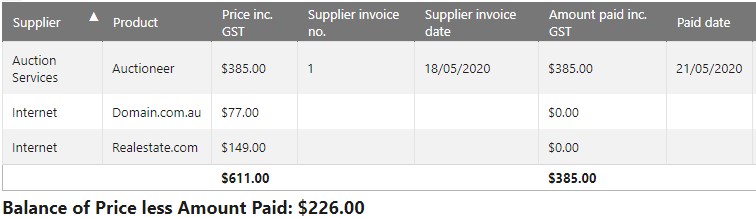
- Balance of Price less Amount Paid shows us how much more money we expect to spend out of the agency’s pocket
- At the top of the screen we’re shown Balance of Contribution Less Amount Paid. This indicates how out of pocket the agency currently is. Using this current example, because we have paid a $385.00 invoice and the Vendor has paid nothing we are show the below:
Marketing Funds Instructions
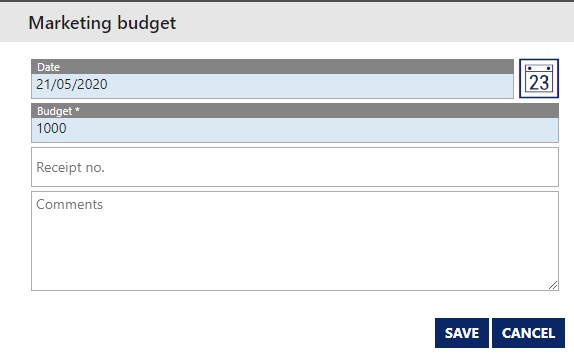
- This section exists to record the Vendor’s budget for Marketing. Simply press Add > Budget Amount to enter this into Core. Date and the dollar amount are the only required fields. In this example we’ll enter an agreed budget of $1000.
- Once a budget has been established, the next likely thing that will happen is you will receive payments from the Vendor. To add these, select Add > Received Amount. Enter the contribution amount and the way the funds were received in the Type field then press Save. In this example we will add a $500 cash payment.
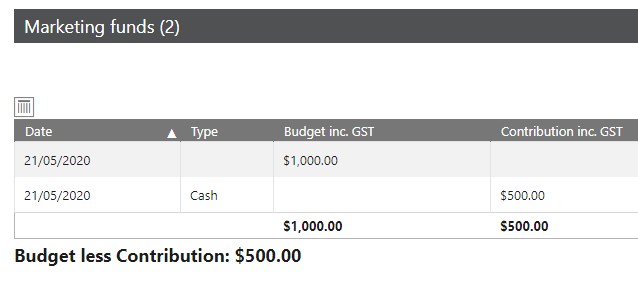
- We can see this now indicated in the Marketing Funds screen. Also note that at the top of the screen, the Balance of Contribution Less Amount Paid field is now showing a positive figure of $115 because the Vendor has paid more than the agencies current outgoings.
Marketing Invoices Instructions
- This section allows you to invoice the Vendor in an official capacity with your agency letterhead etc. Press Create Invoice to start
- In this example we will create an invoice for the Auction Services for $385.00 that have been used in each section of the guide. Enter in your invoice number and invoice date, the description of the item being paid for and the price. Press Save
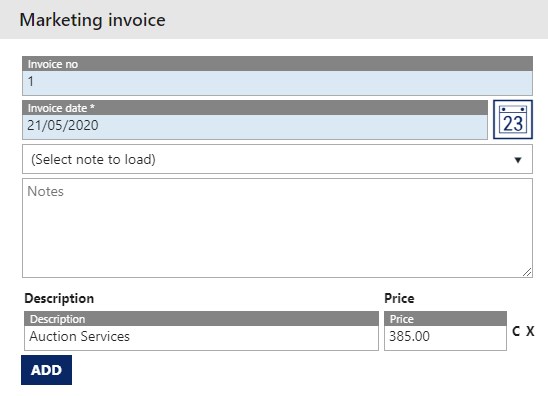
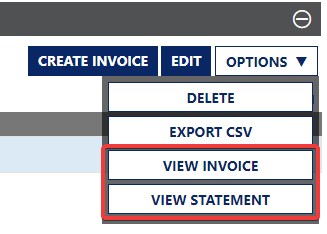
- Once saved, this item appears in the Marketing Invoices section. Click on it once to highlight, then press the Options menu. Here you can Delete, Export etc but more importantly View Invoice and View Statement. These two options create PDF documents that can then be emailed to the Vendor.
Example Invoice

Example Statement
Contract Info
Purpose
The Contract Info tab is the likely singular place you will want to look to see the dollar figures associated with a proprties sale. While you can edit the information in here directly, it is best to add it to the property when taking it through it’s sale lifecycle ie Edit Property Stage.
Instructions
- Opening the Contract Info tab presents you with the following screen
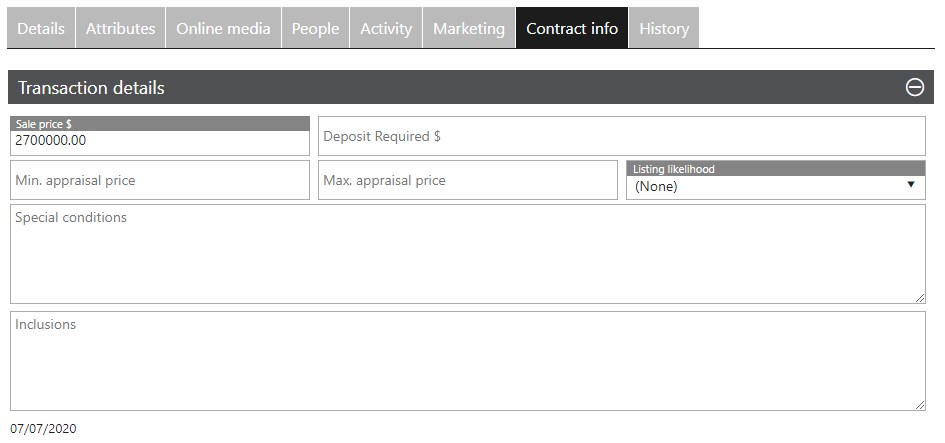
- As mentioned in this section’s Purpose, you are more likely to have entered information into these fields during the Property’s sales lifecycle. In this example, we’ll use a property that has already been sold. At the top of the window, note the Sale Price already populated, and down the bottom left the date 07/07/2020. This is the Anticipated Settlement date.
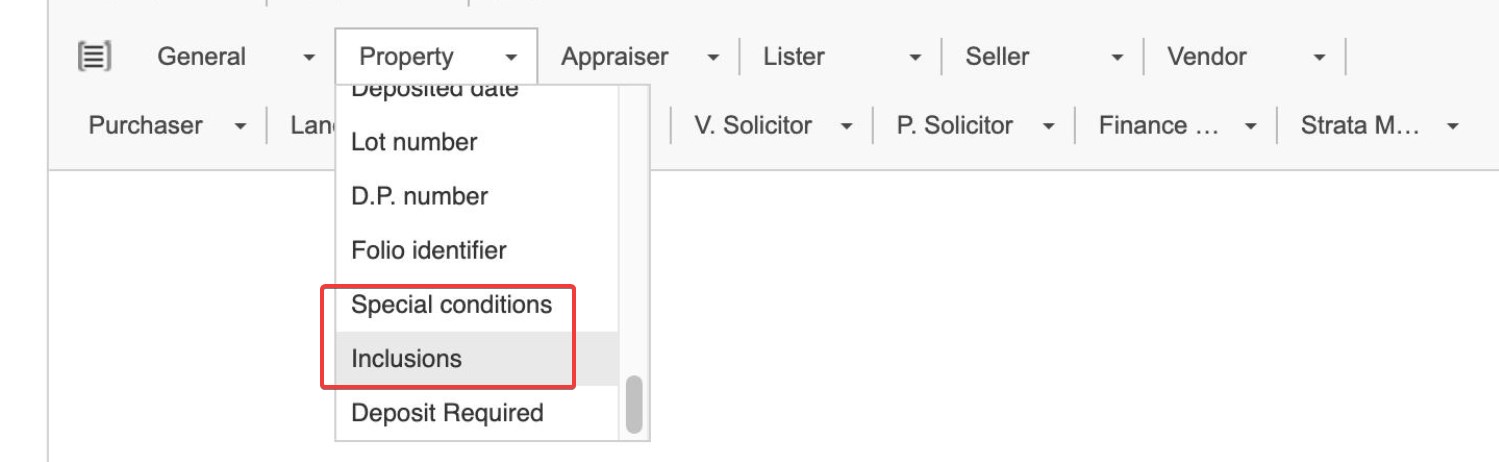
- Other fields available here, but not required to sell the property are the Deposit Required field, to make a note of the dollar figure required by the Vendor. The Min and Max Appraisal fields will be pulled in from the Market Appraisal Stage if used. Special Conditions and Inclusions are notes fields for you to use if you wish. If populated, the Special Conditions and Inclusions can be used when sending a letter out relating to this property so that they do not need to be written a second time. Example below:
- Expand out the Deposits heading to make a record of any deposit made on the property. Here you list the amount, the date the deposit was made, the stage of the sale and a receipt number if you wish to record one. Deposits can be created, edited or deleted in this area.

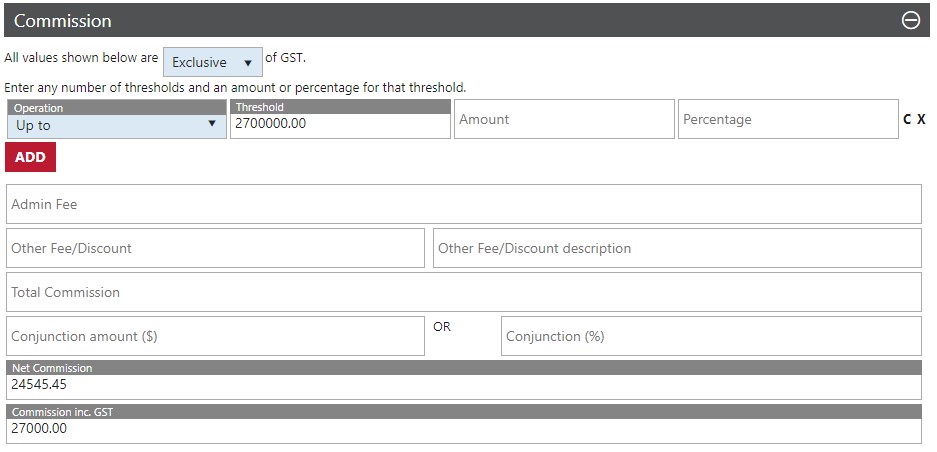
- The Commission area can be as simple, or complex as you want it to be. Again, this is likely to have been populated when then Property entered into the sales part of it’s lifecycle. In here you can set dollar threshold amounts with either a dollar figure, or percentage to calculate commission.
- Add any fees and/or discounts that need to be applied
- Lastly, if the property is being sold in “conjunction” with another agency the commission split can be worked out here. The Net and Inc commission figures will be automatically calculated at the bottom of this window. Visual reporesentation of this below:
History
Purpose
The history section shows you a chronological ordered list of the some important property features. They are:
Sales Stages – Lists the date, the type of change, who changed it and any Users associated with it.
Import/Export Log – A visual representation of your property leaving the Core system and going to your portals. You will be able to see date and times associated, and when the items are queued also.
SMS’s Sent – A list of SMS’s sent that relate to the property. You can see the recipient, who sent it and what the message was.
Market Appraisals – a list of market appraisals that relate to the property. Listed is the type, date, appraiser name, min price, max price and the listing likelihood from the vendor.
There isn’t any functionality in any of these screens apart from the ability to extract your Import/Export log into a spreadsheet.
Instructions
- As this area is purely visual, there are no instructions. Simply expand the section you wish to view